
Mark Miller at EndUserSharePoint.com is hosting a free 1 hour presentation on SharePoint dashboards. This presentation is targeted towards end users, but I would recommend that developers take some time to check it out. It is simply amazing what the end-user is empowered to do in SharePoint, and it may help you with ideas for your projects. The presentation is scheduled for 1pm EST, Tuesday (that's tomorrow). I recently attended one of Mark's presentations, and you will not be disappointed. He is an excellent communicator and does a great job of educating you in SharePoint. Visit http://www.endusersharepoint.com/?p=785 for more details.
15 September 2008
18 June 2008
Guest Posts on EndUserSharePoint.com
Categories:
Other Blogs,
Search
I have teamed up with a great group of guest bloggers on Mark Miller's site, EndUserSharePoint.com. The site is dedicated to assisting end users with the every-day use of SharePoint. I am writing a series on how to create a team site search center. Here are links to my two articles already posted on the site:
- Exploiting or being Exploited by SharePoint Search
- EndUserSharePoint.com: First Steps in Defining Search Scope
06 May 2008
Resources worth reading for SharePoint Developers
Categories:
Sharepoint Application Concepts
Yesterday, Eric Shupps posted a great article for getting started with SharePoint development. If you are just getting started with development for SharePoint, I highly suggest taking a few minutes to read his article. Also, here are some good resources for you to consider when starting to develop for SharePoint.
29 April 2008
Broken Web Parts
Categories:
Tips and Tricks
Have you ever had a web-part that started creating errors that wouldn't allow you to get to your page for editing it? Here's a cool little tip that might get you up and going with much less frustration. Append ?contents=1 to the end of your URL for the page that contains your problematic web part. This will take you to the web-parts management page that will allow you to remove the troublesome web-part from the page. https://<server>/<site>/?contents=1
14 April 2008
DevConnections, Orlando, Florida
Categories:
General Observations
Just a heads up for any that are interested, I'm headed to DevConnections next week. I'm exicited about the possibilities and things that I'll be exploring while there. Here are a few of the sessions that I'm planning to attend: Design Powerful Workflows with SharePoint Designer Workflows are essential to business processes. The ability to route a document through multiple stages, gathering feedback, and getting approval from multiple people is a routine procedure in many companies. Now you can take advantage of SharePoint’s built-in support for workflows to design powerful multi-step workflows. You will learn how to make use of the built-in workflows directly through SharePoint’s interface. Then you will see how to develop powerful workflows—without any code—using Microsoft Office SharePoint Designer. Intelligent Dashboards Made Simple Microsoft Office SharePoint Server 2007 (MOSS) incorporates significant enhancements in presenting Business Intelligence data to the end user allowing them to share, control, and reuse business information to make better decisions. MOSS is utilized to enable information workers to build business intelligence (BI) dashboards in any SharePoint site. The dashboard can provide a bird’s eye view to easily and quickly analyze data or to measure progress of any organizational metrics or goals. This session will show how easy it is to build a powerful BI dashboard using information from various data sources. Even data from Excel spreadsheets, hosted in SharePoint document libraries, will be used along with other data sources. The end result will show a visualization of Key Performance Indicators, graphs, and charts of the data that’s easy to understand and analyze. Quick Integration from SharePoint to Your Application Do you need a quick way to add search to your application? Do you want to add document management including version control and check in/out? In this session, you’ll learn how you can use SharePoint to add more robust features to your application—and how you can use SharePoint to provide a central framework around your existing individual applications. The Hidden Architect—Building Solutions for Smaller Organizations Large enterprises and governments with large projects can justify and afford formal system architecture and design and can afford the loss when a project self-destructs (as they so often do). But what about smaller businesses and their Web applications? These organizations fall victim daily to poorly designed solutions that aren't what they needed in the first place. They need help figuring out what they really need—help they often don't realize they need and are reluctant to pay for. It's not enough to be a Web or application developer when it comes to this kind of client or project—you have to be a system architect as well, even though you don't wear the title and may not be able to charge for the service. So how do you become a system architect? This session might be a good start. You’ll cover requirements, economics, client management, creative and flexible design strategies, and how to look beyond "best practices" design patterns to find solutions that fit the client, instead of trying to fit the client to the solution. P.S. Bring your favorite horror stories for show and tell! If you're planning on attending this event, I'd love to meet you. I'm always interested in meeting those entrenched in the SharePoint world! It amazes me the number of tricks and tips I learn from each individual I've had the opportunity to meet!
Training Site Template Available for Download
Categories:
Customization,
SharePoint Designer,
Site Definitions
As promised, here is the training site template available for download. Please be advised that this file is for demonstration purposes only. I am making it available to the community as an educational resource only, and therefore offer no support for the actual installation and use of the template. TrainingSiteTemplate on SkyDrive. Known Issues
- Opening in SharePoint Designer shows as unable to render. I have no idea why this happens, but hopefully it will be addressed by Microsoft at some time. The error message is non-descriptive at best and makes it difficult to troubleshoot.
- Web Part Connections have been removed In the original template, all of the items made use of web part connections to filter the main list of training resources. I continuously received error messages when provisioning a new site with established web part connections. I believe this may be another short-fall of SharePoint designer, as this has been my experience no matter how many different SharePoint deployments I've used.
Please feel free to comment on your experiences with this site definition. I hope it helps you envision a plan for your own templates and zero-code solutions.
08 April 2008
Heroes Happen {here}
Categories:
General Observations
I just got back in from a day at the Heroes Happen {here} launch event hosted here in the DFW area. It's interesting to see the roadmap that Microsoft has put before us as we move forward in our industry. One of the points from the keynote that most intrigued me is the idea of changing the 80/20 rule. This is the rule that states in most IT departments, 80% of your time is maintenance and only 20% is innovation. The new goal for the 2008 line of server products is to try to move IT from a cost center to a strategic asset in the company. This means that the 80/20 rule would still apply, but now 80% of your time is innovation. Personally, I don't see this is an attainable or realistic goal. It is a good one, but the reality is that most IT departments spend a large chunk of their time recovering from poor communication between the user and the IT professional. Until users and IT professionals can begin speaking the same language, there will always be a level of communication missing. One thing that didn't seem to be a factor in this new 80/20 idea is cost. While it would be great to spend 80% of your time in innovation, that also means you are potentially spending more to attain that innovation. With that stated, I think the new line of server products will be a great boost in the right direction. There is a feature that has excited me with SQL 2008. In SQL 2008, the SQL Report Designer has been transformed into a stand-alone application. This means that the report designer can be placed on a desktop as a stand alone application, enabling business users to create reports from data housed in SQL 2008 databases. As a developer, one of the things that bothers me most is the continual request for new reports. By giving the end user a tool like this, I can now forcus my time on building the complex reports while allowing the business user to tweak the reports. Also, SQL 2008 Reporting Services also includes gauges for use in your reports. I believe this is a new addition to the platform, and one that has been needed for quite some time. Don't go looking for fancy new color schemes or exciting graphically diverse charts though. They still look very similar to the charts found in 2005. Unfortunately, the only break-out I was able to attend was the first session of the developer track. While informative, since we have migrated our team to Visual Studio 2008 it was rehashing all of the things we'd already discovered or heard from other Microsoft events. There were some other tracks that looked interesting, but I had personal obligations that I required me to leave (and since it is an hour trip from Dallas to Fort Worth by train, I had to leave). Overall, I'm excited about the possibilities of this new product line, but I'm going to have to spend some time diving deeper into the new features and resources for these products. Having just recovered from being on the front edge with Office 2007, SharePoint 2007 and Windows Vista, I think we're going to give these products a year or so to mature.
07 April 2008
Two Articles with Developer Implications
Hello again! I apologize for the long period of silence, but I hope to be back over the next month with a few posts. In the mean time, here are a couple of blog posts that I have recently found that I think would be good for consideration by developers.
- EndUserSharePoint.com: Five Ways to Manage a SharePoint Site Collection with SharePoint
This is an excellent tip on governance structures. Where this might be applicable to a developer is the use of a workflow to assist in the provisioning of sites. - EndUserSharePoint.com: Weekly Newsletter
Another good article with a tip on when you might want to use a blog vs. a wiki. We have begun using this tip internally to help us support various software platforms. It's worth a look as a developer to take back to your development teams to discuss ideas on collaborating with your code!
Also, I am planning to post the zero code training site this month, so be on the lookout!
06 February 2008
Controlling the Result Type for Calculate Fields
Categories:
CAML,
Sharepoint Application Concepts
I recently was faced with the problem of rendering a calculated field using a feature. The feature creates and provisions a set of columns and content-types available for use in the site. However, one of the problems I faced was creating a calculated field that needed to render it's output as currency. Since SharePoint users the defaults when defining new fields, it was performing the calculations correctly, but displaying them as raw, unformatted text. When looking through the SDK, there doesn't appear to be any way to control the content (or it has not yet been documented). So, I decided I'd let SharePoint help me out. I created a new list and added several currency columns to the list. I then created a calculated column that would subtract the last currency number from the first currency number. Next, I saved the list as a list definition and downloaded it to my local computer. The .stp file that is created is nothing more than a CAB file. I appended the filename with .cab and then opened it up. Inside is a manifest.xml file that contains the definition of the list (if you're ambitious enough, you could create your own list definitions and upload them by reversing the process). Opening the manifest.xml file, I then locate all of the field definitions for the list. This is where I found the payload. There is an attribute that can be added to a calculated column definition to control the result of the calculation. It is the ResultType attribute. So, here's my definition:
          <Field Type="Currency" DisplayName="Val1" Required="FALSE"
                Decimals="2" LCID="1033" ID="{66df31d6-dd22-4a17-8d4f-5f4b9a1be790}"
                SourceID="{02d65904-8cbb-407d-9668-67441581ed38}"
                StaticName="_x0056_al1" Name="_x0056_al1" ColName="float1"
                RowOrdinal="0" Version="1"/>
          <Field Type="Currency" DisplayName="Val2" Required="FALSE"
                Decimals="2" LCID="1033" ID="{66c6624c-88fb-4d26-9c5b-3615548b76db}"
                SourceID="{02d65904-8cbb-407d-9668-67441581ed38}"
                StaticName="_x0056_al2" Name="_x0056_al2" ColName="float2"
                RowOrdinal="0" Version="1"/>
          <Field Type="Calculated" DisplayName="Var" Format="DateOnly"
                Decimals="2" LCID="1033" ResultType="Currency" ReadOnly="TRUE"
                ID="{a415e859-b8f9-4168-a63d-e5fbcbbfba7b}"
                SourceID="{02d65904-8cbb-407d-9668-67441581ed38}" StaticName="Var"
                Name="Var" ColName="sql_variant1" RowOrdinal="0">
                <Formula>=_x0056_al2-_x0056_al1</Formula>
                <FieldRefs>
                   <FieldRef Name="_x0056_al1"/>
                   <FieldRef Name="_x0056_al2"/>
                </FieldRefs>
          </Field>
As you can see, the calculated field's result type is controlled by the ResultType attribute. I took this new found knowledge back into my project, plugged it in and everything worked just as expected!
01 February 2008
Create a Zero Code Web-Based Training Site
Categories:
Customization,
SharePoint Designer
One of the best tips I've come across recently has been the use of a Creative Commons Attribution 3.0 License javascript library called LyteBox. This library allows you to incorporate some pretty cool effects into SharePoint using a simple content editor web part. Using this javascript library, a content editor web part and SharePoint Designer, my plan is to walk through creating a simple training site that gives users a Web 2.0 feel to training content.
First, download the scripts from the link above. After you have downloaded the scripts, create a new blank site. We're going to add our own lists and libraries to this site, so there is no need for us to have any existing content.
Getting LyteBox Setup
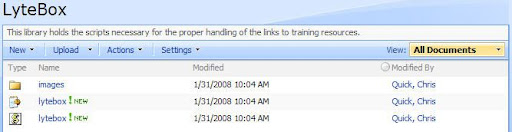
When you're new site has been provisioned, create a new document library called LyteBox and place all of the scripts and images into this library. Be sure to place all of the images in a new folder in this library called images.
Now, edit the page of your site and add a new content editor web part to top-right zone of the homepage (default.aspx). Edit the shared web-part and include the following lines using the source editor:
<script type="text/javascript" language="javascript" src="lytebox/lytebox.js"></script>
<link rel="stylesheet" href="lytebox/lytebox.css" type="text/css" media="screen" />
Change the Appearance of the web part and turn off the chrome. This way, the web part will not be displayed at all. If you'd like, export this web-part for reuse in other places in SharePoint.
Creating Training Libraries and Lists
Next, we need to create a few libraries and lists to use for our site. I need a library to contain basic HTML pages and resources for those pages, a list to create categories for the training labs and a list to contain the actual training labs.
Create a new document library called Resources and upload a few sample HTML pages (or create them with SharePoint Designer or a similar tool). This will be the place that you can upload all of the materials needed for your training labs. Our organization will be creating Camtasia projects for the users to review. You could include anything that is HTML based for your users in the library.
Next, create a custom list to contain a list of categories. I named this list Categories and added the following items: Excel 2007, Word 2007, SharePoint 2007. This list will be used as a lookup for categorizing your training sessions (and as a connected web-part for filtering the list of available labs).
Now, the next list is the "meat and potatoes" list because this is where you will be organizing the labs that are available. Create another custom list called Training Labs and add the following columns to the list:
- Category, Lookup, Required -- linked to Categories - Title
- Description, Multiline
- Width, Number
- Height, Number
- Resource Link, HyperLink/Picture -- set to hyperlinks
At this point, you may want to create some items for testing when we get into SharePoint designer. The idea is each item will provide a link to the resource using the resource link column. This will be linked to an HTML page in the Resources library. The width and height columns will be used to control how large the LyteBox window becomes using some cool SharePoint designer items.
Now the basic lists are available and ready to use for your site. Its time to start wiring up all the pieces with SharePoint Designer.
SharePoint Designer
Open the site using SharePoint designer and then double click default.aspx to open the page. In the toolbox (or click Task Panes), go to the Data Source Library and locate the Training Labs list. Click on the list and choose Show Data. In the list, highlight the title column and drag this over to the default.aspx page right zone. Drop it in place below the content editor we placed in the page earlier.
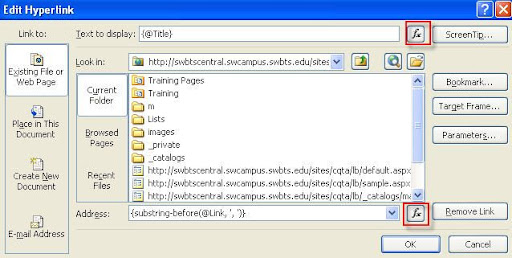
Now, using the Common Data View Tasks Widget, modify the columns you wish to display. I added in the description and category fields to my display. Click on the widget for the title column and change it into a hyperlink column. For the hyperlinks properties, make sure the Text to Display is set to {@Title} and the Address is set to {substring-before(@Resource_x0020_Link,', ')}. The easiest way to do this is to click on the Fx button for Address and choose the Resource Link from the list and then do the same for the Text to display.
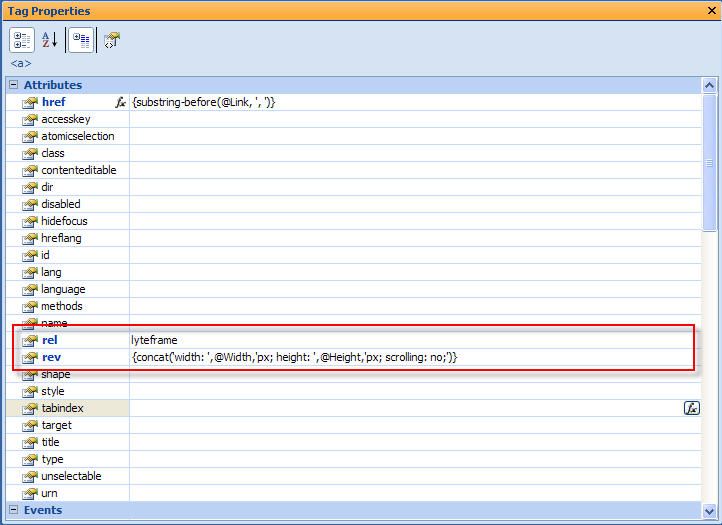
Now for the fun part. You will need to make some modifications to the tag properties of the hyperlink so the LyteBox script will execute on the link. In the rel attribute, set it to lyteframe. Then locate the rev attribute and choose the function box. Make sure to use the following function in the dialog:
concat('width: ',@Width,'px; height: ',@Height,'px; scrolling: no;')
Now, your properties should look something like the following:
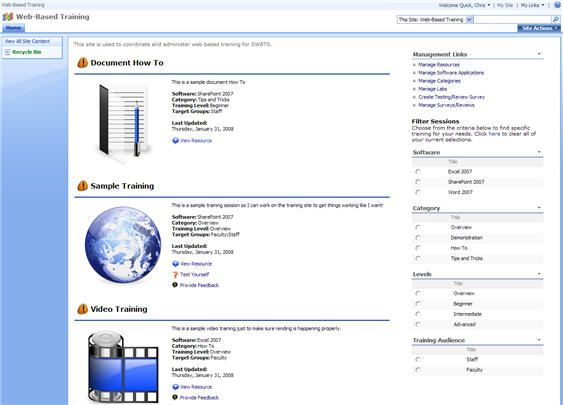
You should be ready to save your page and begin testing it out. If you have been successful, your resources should load up in a Web 2.0 feeling box that dims the surrounding area and displays the content in the box.
Filtering Content
The final step to make this site more useful is to allow your users to filter the content based on the category. To do this, in SharePoint, edit your page and add a web part for your Categories list to the Right zone (you can also do this from inside of SharePoint Designer, but I prefer SharePoint's ability to set the properties of the web part).
Go back into SharePoint designer and reload the page. Right click on your Categories Web Part and choose Web Part Connections.
- Set the connection to Provide Row To and click Next.
- Choose to Connect to a Web Part on this Page and click Next.
- Choose the Target Web Part as your Training Labs DataView and the Target Action to Get Filter Values From
- Match up the columns between the Categories List and the Training Labs List. This should be to set the Categories List to Title on the same row as the Training Labs category row.
- Click on Finish.
Now save the page and load it up in your Browser. Test that the filter gets applied and you can now review training labs based on the way your filter is set.
I'll see if I can't upload the template I've created for you to dissect and play with. My final template looks like the following:
24 January 2008
Word 2007 Mail Merges with SharePoint Lists
Categories:
Office 2007,
Tips and Tricks
Here's an interesting tip that I was able to contribute to EndUserSharePoint.com. This might be a good tip for developers as well as end users. The post describes how to make use of a SharePoint list in Word by connecting to an Access 2007 database.
23 January 2008
ExpGroupBy(obj) Javascript Function
Categories:
Sharepoint Application Concepts,
SharePoint Designer
There are times that I am glad to be a SharePoint developer. Today is one of those days! I have been working on a web part that needs to roll-up a lot of data from multiple sub-sites for a dashboard style view. The view needs to group the data by two separate criteria (Unit and Category). Additionally, the desire of the project sponsor is to have all of the items be in a collapsed view with the ability to expand those items on demand. I begin thinking to myself, "Great -- I get to play with Javascript!" Now, repeat that statement with as much sarcasm as you can muster and you have a good idea of my state of mind.
I then remember that I can use SharePoint Designer to create a view similar to my target view. Okay, let's create a list and add several items to it. I now have my "test data" to begin my experiments. Opening up SharePoint Designer, I create a dataview of my list and then specify two levels of grouping. I save the page and then open up the page in IE.
I play with the grouping and find that it is exactly how I want to implement this functionality for my client. So, the fun work of dissecting code begins. During my investigation, I notice that there is a call to a javascript function ExpGroupBy being issued when I click on the handy 'plus' and 'minus' images. After further investigation, I learn that this is a function available in the core.js script file. Hurray! I can use this!
So, I make the necessary modifications to my web site and create my headers and footers for each group, assign unique ID's and then test it in IE... crash! The javascript doesn't work. Here's a sample of the table I was using:
<tr id="group0" style="display: block">
<td class="ms-gb" style="background: #cccccc;" colspan="8">
<a href="javascript:" onclick="javascript:ExpGroupBy(this);return false;">
<img src="/_layouts/images/minus.gif" border="0" alt="expand" name="collapse"></a>
UNIT 10000</td>
</tr>
<tr id="group1" style="display: none;">
<td class="ms-gb" style="background: #cccccc;" colspan="8">
<a href="javascript:" onclick="javascript:ExpGroupBy(this);return false;"><img src="/_layouts/images/minus.gif" border="0" alt="expand" name="collapse"></a>PERSONNEL EXPENSE</td>
</tr>
<tr>
<th class="ms-vh">Cost Center</th>
<th class="ms-vh">Description</th>
<th class="ms-vh">Prev. Budget</th>
<th class="ms-vh">Prev. Actual</th>
<th class="ms-vh">Current Budget</th>
<th class="ms-vh">YTD Actual</th>
<th class="ms-vh">Proposed Budget</th>
<th class="ms-vh">Increase/Descrease</th>
</tr>
<tr class="ms-alternating" style="display: none;">
<td>
10-10000-1000002</td>
<td>
<a href="http://sharepointdev/sites/budgtest/10000/Lists/Cost Centers/EditForm.aspx?ID=3&Source=/sites/budgtest/Shared Documents/Centers.aspx">Sample Cost Center</a></td>
<td align="right">
$25,365.00</td>
<td align="right">
$25,365.00</td>
<td align="right">
$25,365.00</td>
<td align="right">
$4,289.39</td>
<td align="right">
$0.00</td>
<td align="right">
$29,500.00</td>
</tr>

.....


<tr id="group2" style="display: none"><td class="ms-gb" style="background: #cccccc;" colspan="2">
PERSONNEL EXPENSE Totals:
</td>
<td class="ms-gb" style="background: #cccccc;" align="right">
$439,370.00</td>
<td class="ms-gb" style="background: #cccccc;" align="right">
$439,370.00</td>
<td class="ms-gb" style="background: #cccccc;" align="right">
$439,370.00</td>
<td class="ms-gb" style="background: #cccccc;" align="right">
$141,865.06</td>
<td class="ms-gb" style="background: #cccccc;" align="right">
$0.00</td>
<td class="ms-gb" style="background: #cccccc;" align="right">
$29,500.00</td>
</tr>
<tr id="group3" style="display: none"><td class="ms-gb" style="background: #cccccc;" colspan="2">
PERSONNEL EXPENSE Totals:
</td>
<td class="ms-gb" style="background: #cccccc;" align="right">
$439,370.00</td>
<td class="ms-gb" style="background: #cccccc;" align="right">
$439,370.00</td>
<td class="ms-gb" style="background: #cccccc;" align="right">
$439,370.00</td>
<td class="ms-gb" style="background: #cccccc;" align="right">
$141,865.06</td>
<td class="ms-gb" style="background: #cccccc;" align="right">
$0.00</td>
<td class="ms-gb" style="background: #cccccc;" align="right">
$29,500.00</td>
</tr>
So I loaded this up in IE and to my surprise it ALMOST worked. When I clicked on the unit expand/collapse, the entire table would be collapsed from that place. So if I had multiple units, I would only see a single unit. The same thing would happen if I collapsed a category -- all units and categories below would also collapse.
After further investigation, I learned that the function works by examining the ID of the table row containing the group header and footer. This is how it determines the current level you are viewing to collapse the correct items. So, for my example I needed two group ID's, group0 and group1. Each first level group row header/footer (Unit) was assigned the ID group0 while all second level group rows header/footer (Category) were assigned the ID group1. Once I figured this out, the function began working properly!
17 January 2008
Access Denied when using SPSite.AllWebs
Categories:
Sharepoint Application Concepts
As I have been working to develop a web part that our organization will use to present roll-up data from multiple sub-sites to a top-level site, I've come across a n interesting tid bit that was frustrating at first.
It is the use of SPSite.AllWebs property. Check this code:
            ArrayList Lists = new ArrayList();
            SPSite CurrentSite = SPContext.Current.Site;
            SPContentTypeId ContentType = new SPContentTypeId(PARENT_CONTENT_TYPE);
            SPWebCollection UserSites = CurrentSite.AllWebs;

            foreach (SPWeb web in UserSites)
            {
                foreach (SPList list in web.Lists)
                {
                    if (list.ContentTypesEnabled)
                    {
                        try
                        {
                            bool ContainsType = false;
                            SPContentTypeCollection Types = list.ContentTypes;
                            foreach (SPContentType Item in Types)
                            {
                                if (Item.Id.IsChildOf(ContentType))
                                {
                                    ContainsType = true;
                                    break;
                                }
                            }
                            if (ContainsType)
                            {
                                Lists.Add(list);
                            }
                        }
                        catch
                        {
                        }
                    }
                }
When running as an administrator, this code doesn't cause a single problem. However, if you swap to a non-administrative user that doesn't have full control of the site, you'll get the lovely access denied page. The problem is that you must have full control of the site to be able to use the AllWebs property.
The fix for this is to use a property of the SPWeb object. See the corrected code below:
            ArrayList Lists = new ArrayList();
            SPSite CurrentSite = SPContext.Current.Site;
            SPContentTypeId ContentType = new SPContentTypeId(PARENT_CONTENT_TYPE);
            SPWebCollection UserSites = CurrentSite.OpenWeb().GetSubwebsForCurrentUser();

            foreach (SPWeb web in UserSites)
            {
                foreach (SPList list in web.Lists)
                {
                    if (list.ContentTypesEnabled)
                    {
                        try
                        {
                            bool ContainsType = false;
                            SPContentTypeCollection Types = list.ContentTypes;
                            foreach (SPContentType Item in Types)
                            {
                                if (Item.Id.IsChildOf(ContentType))
                                {
                                    ContainsType = true;
                                    break;
                                }
                            }
                            if (ContainsType)
                            {
                                Lists.Add(list);
                            }
                        }
                        catch
                        {
                        }
                    }
                }
By using the GetSubwebsForCurrentUser() method, I'm able to get a list of subsites that the user does have access to view. If the user doesn't have access to any subsites, there will not be the access denied error message and you can display a warning to the user.
11 January 2008
VB.NET Translation for Thomas Conté's Code
Categories:
Sharepoint Application Concepts
As a side note, here is the translation of the code to VB.NET from Thomas Conté's post.
        Dim PageFile As SPFile = _ManagedWeb.GetFile("default.aspx")
        Dim WebPartManager As WebPartPages.SPLimitedWebPartManager = PageFile.GetLimitedWebPartManager(Web.UI.WebControls.WebParts.PersonalizationScope.Shared)
        Dim TargetList As SPList = Me.GetList(ListName)
        Dim TargetListWebPart As WebPartPages.ListViewWebPart = New WebPartPages.ListViewWebPart()
        TargetListWebPart.ListName = TargetList.ID.ToString("B").ToUpper()
        TargetListWebPart.ViewGuid = TargetList.DefaultView.ID.ToString("B").ToUpper()
        TargetListWebPart.ChromeType = Web.UI.WebControls.WebParts.PartChromeType.TitleOnly
        WebPartManager.AddWebPart(TargetListWebPart, Zone, Ordinal)
        PageFile.Update()
Programmatically Adding Web Parts to Pages
Categories:
Customization,
Sharepoint Application Concepts
Today I was working to make modifications to a site that was being provisioned via automation code. The code creates a batch of sites and then uploads various data to the site for review by members of the site. The goal of the automation is to insure a consistent user experience with web parts to containing lists and libararies in the same place. However, I couldn't see exactly where this would be accomplished in the object model of SharePoint, so I pulled up Google and began searching. I came across this post by Thomas Conté that was very helpful.
Subscribe to:
Posts (Atom)

