27 November 2007

First Impression of the Business Data Catalog Definition Editor

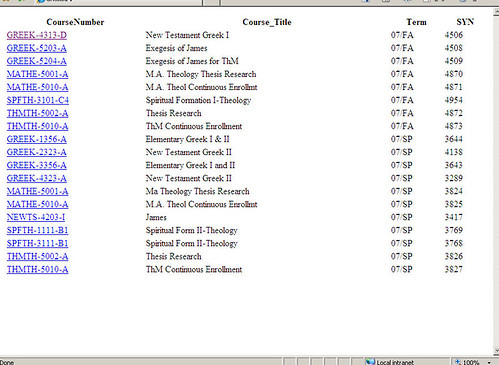
One of my recent projects involved deciding where to place the results from a database. The database maintains cataloging information on a collection of works housed in the library on the campus where I work. The collection contains around 40,000 entries. While this isn't necessarily a huge list, I determined that a SharePoint list would probably carry too much overhead. This lead me to the Business Data Catalog, and thus my first project to work with the BDC Definition Editor that ships with the latest MOSS SDK.

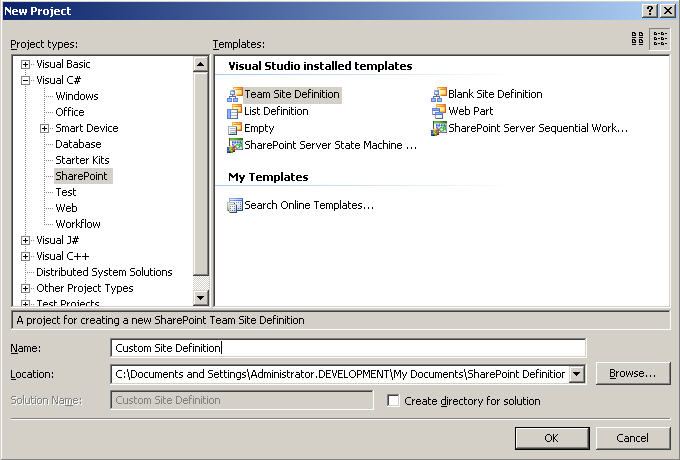
After installing the application (located in C:\Program Files\2007 Office System Developer Resources\Tools\BDC Definition Editor), I began the exploration of the tool. I started out by adding a ne LOB system. The interface that appeared allowed me to either specify a database connection or a web service connection. This is where I register my first complaint with the tool. I had to provide a complete connection string. This would have been a good place to include a wizard that would help specify the connection options, etc.

Once I provided the connection string and connected to the database, my experience began to improve significantly. I was able to select tables and views to include as BDC entities just by drag-and-drop operations. The BDCDE also recognized relationships and allowed me to choose to import these as well. Once my entities were defined, I just simply clicked on OK and the BDCDE created the bare essentials for each entity. This included both a SpecificFinder and an IdEnumerator.

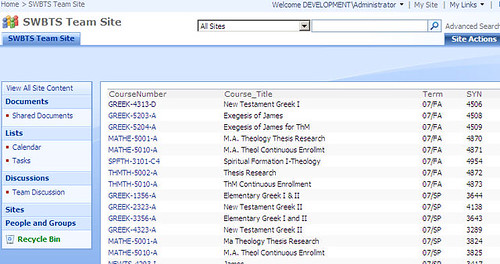
At this point, I decided to see what functionality was provided without any modifications. I saved the definition and then jumped into my SSP to import the definition. My test environment wasn't set up correctly, so I had to spend a little time tweaking permissions -- but once this was done I could easily view the profile page for each entity. They were working without an issue. However, since no Finder method was created by default, I couldn't use any of the entities with the BDC web parts.

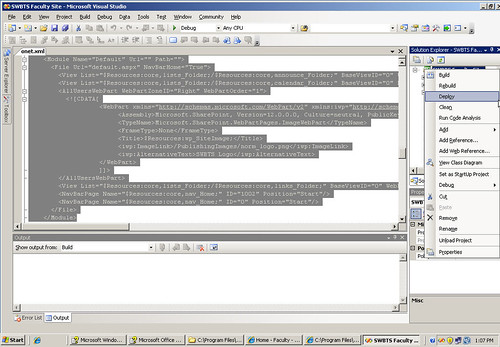
Jumping back into the BDCDE, I created a finder method and was surprised to find there is no way to copy an established parameter to another method. The only difference between the specific finder method and the finder method was the lack of input parameters, so I would need to recreate the return parameter. With a little creative thought, I decided to open the XML definition in Visual Studio. I located my return parameter and copied the xml nodes and placed them in the Finder method. I then imported the definition back into the BDCDE, saved the definition and tested it using SharePoint. I now had a working finder and could return a BDC list.

The next experiment was to create filters. This is where being able to move a parameter node up or down would be very beneficial. I created my filters and tied them to parameters. However, when I attempted to Execute the Finder instance, I received an error message "Could not find exactly 1 Member with the name 'xxxx' Parameter Name: fieldName. After some experimentation, I discovered that the In parameters must be specified prior to the Return parameter. So, back to Visual Studio with the XML definition. I moved the parameter via copy and paste. After I loaded the definition in the BDCDE, I was able to execute the method and filter the result set.

Overall, I'm very impressed with the functionality included with this tool. It has significantly increased my productivity in creating BDC definitions for use in my SharePoint environment. It sure beats attempting to author the definition by hand! However, there are some functions that are missing or should be included in the next iteration to help this become a powerful tool. This includes the ability to clone a return type, move parameters, specify filters later in the development and auto-versioning the file. If you can't afford to purchase BDC Metaman, this is an excellent alternative!

08 November 2007

Querying a Web Service with InfoPath 2007

One of the things that I have found very useful with InfoPath 2007 is the ability to query web services for data. In one of my recent projects I was asked to have an employee enter their ID and return some specific information about them to be used in an InfoPath form. The group involved wanted to make sure that the name of the employee was the official name found in the HR database.

So, my first thought was, great, I'm going to have to create a custom web part or field type for SharePoint -- then I discovered that InfoPath has the capability of querying web services. This changed my game-plan significantly. So, without further explanation of the project, here are the steps taken to query a web service using InfoPath.

Step One - Create The InfoPath Form

I begin my process by laying out the required data-source elements. The group wants to return the official name of the employee based on their employee ID. So, I create my data-source with the following nodes:

I now add my fields to the InfoPath form using the Layout task-pane. For the purposes of this demonstration, I have removed the additional data elements.

Because I don’t want the employee changing the first name and last name fields, I am going to set these both to read-only. This is accomplished by right clicking on the field and choosing Text Box Properties. One the display tab, you’ll see the read-only checkbox.

Now that these items are ready only, I’m ready to move on to step two.

Step 2 – Create the data connections

From the menu, I choose Tools -> Data Connections.
I currently don’t have any data connections defined, so I will need to add my data connection. In this situation, I already have a web-service that connects to my HR database. I just need to connect InfoPath to the web service, so I click on Add.
In the dialog that appears, I choose to create a new connection to receive data.
In the list of options presented, I select from a web service. I am prompted to enter the URI for my web service or to use UDDI to locate a web service. After you have selected the web service, you will be presented with all of the available methods. For my example, I will be choosing the method to return an employee by id as XML data.
The next two screens present the available parameters and ask me to fill them out. The first screen is used to gather the schema of the returned data. The second is to create a default value. This method expects a single employee id formatted as an integer. In my situation, I set both of these to my employee ID (mainly because it’s the only one I know from memory).
Now I’m asked by InfoPath if I want to store a copy of the data in the template. This will be based upon your situation, so I have no recommendation. Since I’m returning a single record, it almost seems pointless to store the record with this template, so I have chosen not to store any data.
Finally, you’re asked for a name and if you want to automatically retrieve data when the form is opened. Set these values and click Finish. I have now created my data connection to retrieve employee information. You should be able to change your data source on the data source task pain to explore the returned schema.
Step Three – Linking Everything Together with Rules
Now that I have successfully connected to my web service, I need to create a rule that will populate the name based on the employee ID typed into the employee ID field. Begin by right clicking on the Employee ID field and choosing Rules.
The trick to getting this to work is to use the Employee ID field to pass the required parameter to the web service and re-querying the web-service with the new parameter. So, I need to create a new rule that will take care of this functionality for me. From the rules dialog, I click on Add. To help me clarify the rule later, I call this rule Set Employee Name.
I create a new action to set a field’s value. This is where some of the magic will happen. For the field, I click on the Browse Icon and select my web service from the data source drop down. You should see query fields and data fields as nodes in the tree. Open the query fields until you find your parameter. Click on the parameter and click OK to set this value.
For the value, I set this to the current node by selecting the function icon and choosing to insert a field or group. Make sure your main data source is selected and choose the appropriate field. In my case, this is the employee ID field. Once these bindings are done, I click OK.
I now need to add an action to query the web service, so I click on Add Action and choose Query using a data connection in the action drop down. Since I only have one data source, I choose the only available data source and click OK.
Now, the final step is to add an action to set the fields of my main data source to the retrieved values from the web service. I click on Add Action and choose the action to Set a field’s value.
This time, the field will be FirstName from the main data source and the value will be the associated value from the web service. I add one more action to set the last name. Now I’m ready to test it out to make sure it works as expected, so I click OK until I am back to the main form. I now click on preview and test the form to make sure it is able to retrieve the name from the web service and populate my read-only text boxes.
When I enter my employee ID, I find that my name is automatically populated back into the form.

06 November 2007

Developing Search

Tonight I attended the DFW SharePoint Users Community meeting where Bill English presented on building and cataloging search for SharePoint Server 2007. Here are some key thoughts that were revolutionary to me and I think should be considered in any implementation of SharePoint. Many of these items will be focused more on the administration and deployment of SharePoint, but as developers, there are times we may want to consume search results from SharePoint in our solutions. We can have more confidence of the results our solutions provide to the user if the search architecture has been well defined. According to the statistics that Bill shared, our users spend at least 30% of their time just trying to find stuff. For information workers, this is time spent searching file shares, the internet, various in-house systems and SharePoint. The problem doesn't just go away by introducing SharePoint. If you don't have an organized approach to search within your SharePoint implementation, you will end up with the exact same problems currently experienced by your users. A simple concept that we sometimes miss is the fact that as we have more items included in our search indexes, the relevancy of our search results begin to decrease. This is because the more often a word is used causes it to become more general in nature. An example presented was the term horn, horn and horn. They can all be very different -- did you mean a car horn? A horn on an animal? Or a musical instrument? As you can tell, a general search for horn will return all of these items. Even by using keyword searches, we can only improve the situation slightly. Best bets can also help, but they do little to increase relevancy. So what are we to do? Bill suggested the focus of your MOSS implementation should not just be taxonomies or hierarchies, but also findability. This is basically defining how you want your end users to be able to find information using SharePoint. This will also help drive your taxonomy plan as well. Here's a suggested plan that was presented:

  • Define Content Types
  • Group content types into lists
  • Group Lists into Sites
  • Group Sites into Site Collections

One of the other aspects that we tend to ignore in SharePoint is the capabilities of social networks. Users will migrate to finding items by using the least amount of effort. If they know someone that might know where information is located, they may query that person for the location. I find this is the case within my user community. Individuals in my department are continually coming to me to ask me where I stored something in SharePoint -- and I usually know right where it is.

MOSS integrates some key social networking components through the use of My Sites that can assist our users in finding others who might have the information they are seeking. User profiles allow us to define metadata on a person, much as we would define metadata on a document or list item. The metadata is the profile properties defined by the SharePoint User Profile Administrator. This includes properties like skills, responsibilities and even the user's group membership. Users of the SharePoint can also use the colleague web part to build relationships to the people that contain valuable information needed for their tasks.

All-in-all, this meeting was very good and thought provoking. I'm taking the notes back to my team tomorrow to begin discussing what we might be able to do to improve our search within SharePoint.

02 November 2007

SharePoint Solutions Blog: SharePoint Designer Workflows: How to Tell Which Fields Have Changed

I would have never considered this possibility, but this is a very helpful tip! SharePoint Solutions Blog: SharePoint Designer Workflows: How to Tell Which Fields Have Changed

Requirements Gathering

One of the issues that we face as developers is that of gathering the end-user requirements. Many of us have spent countless hours in interviews with users who describe their solution in terms of what they want to see, leaving us to figure out how to merge this with our various development tools. In most cases, I have found this leaves a very large “grey” area where the developer and user are no longer able to communicate. The developer is focused on the implementation and code while the user is focused on usability and customization – and we’ve all been faced with the challenge of having to revamp our solution because the user forgot one key requirement.

In my recent projects, our team has been piloting the use of Wiki’s to help with the gathering of requirements. Basically, we will conduct an initial interview with the stakeholder(s) of the project. In the initial interview, we are only focusing on the identification of the problem. No solutions or possible solutions are ever mentioned. Our focus is to see what the stakeholder is facing in his day to day operations, so we will ask questions based on the current problem – not the expected solution. We will also use this meeting to gather the overall goals in measurable formats. For example, our goals might be something like:

  • We would like to reduce the amount time required for data entry
  • We need to be able to determine how many widgets we sold in a specific quarter
  • We would like to be notified anytime we only have less than 10 items in stock
  • We want to be able to view the details of any specific applicant and handle correspondence in a central location

In most cases, the users are much more capable of defining their intended goals, especially when a technology solution has not even been mentioned. This will allow your team to both define the problem and have measurable goals to reach as you begin developing the requirements.

After we have gathered the initial information from the stakeholder(s), we provision a Wiki site on SharePoint and invite all of the stakeholder(s) in as contributing members. Our notes are condensed and entered into the Wiki’s home page. We then set each of the goals as a separate Wiki page and begin fleshing out requirements based on the individual goal. Each goal page has sections for data, functions, reporting, communication and security. Each requirement will be listed in one of the sections.

As the requirements are attached to each goal, the stakeholder(s) are invited to revise or make notes on each requirement. This way, the developer and stakeholder are able to work in an evolving environment that minimizes the number of follow-up and analysis meetings that would normally be conducted, and all of the notes are organized by goal.

Once a good collection of goals have been established and further defined, we take the wiki pages and flesh out an official requirements document. This document helps to define the scope of the project, the need and impact of each requirement and an overall plan that both developers and stakeholder(s) can use to better understand the document. If there are places in the document that need further definition, it’s back to the Wiki for clarification of the requirements.

The official requirements document contains the following information, and becomes the basis of the project:

  • Data – What are the requirements for working with data in the solution? How will it be accessed? How will it be stored?
  • Functional – What are the major functions that need to be accomplished by the solution? (This is usually the list of goals provided by the end user)
  • Reporting – What type of reports will need to be provided? Will custom reporting need to be available?
  • Communication – Are there any needs to communicate about the items in the solution? How will this be handled?
  • Security – What type of security is needed for the solution? Will there need to be multiple roles? Who will need access? Who doesn’t need access? How do we comply with regulatory requirements?
  • Software – Is there any development tools or additional software that will need to be used or obtained? Will we need to use SQL Server? How about SharePoint?
  • Hardware – Will this solution need any additional hardware? Do we need a new server? What about a router or switches? Can we get that color printer we’ve been dreaming about?

Additionally each requirement is given a classification of Mandatory, Required or Desired. Mandatory requirements must be present for the solution to function. Required requirements are needed, but the system will still be able to function if they are not present. Desired requirements are nice to include, but they are not needed for the system to function. With the sign-off of the requirements document, the stakeholder understands that any non-critical changes are to be included as a future version of the solution.

As I stated at the beginning of this post, we are just now beginning to implement this strategy. For the projects that have been included in this pilot, we are finding that both the stakeholders and the developers are able to bridge the communication gap more effectively. Additionally, when the requirements document is finalized, the overall creep of scope is minimized, leaving both the end user and the developer on friendlier terms with one another!

I would be interested to know if anyone has tried something similar in their endeavors with SharePoint. Please feel free to comment!

30 October 2007

SharePoint Development Environment

I have seen multiple questions posted to several of the forums I participate in concerning how to begin developing against SharePoint 2007. They usually come from users who are copying assemblies from the SharePoint server to their development box and then attempting to develop against it. While this will work in many cases, most developers will find this to be a very difficult approach to development. Others have installed Windows Server 2003 on their desktops and begun developing solutions, but if they accidentally do something unexpected through code, they have to end up rebuilding their machine or reinstalling SharePoint -- thus wasting valuable time.

Since I have gone multiple routes with my development environment, I decided that I would share what has been the best environment thus far (and is recommended standard from Microsoft).

I have a standard desktop with the following configuration:

  • Hardware
    • Intel Core 2 Duo 6700
    • 4GB Memory
    • 250 GB Primary Hard Drive (SATA)
    • 500 GB Secondary Hard Drive (SATA)
  • Software
    • Windows XP Professional, 32-Bit
    • VMWare Workstation 6.0

I have created a virtual machine using Windows Server 2003 R2 and installed MOSS 2007 Enterprise Edition, Visual Studio 2005 and Office 2007 Enterprise Edition. I now do all of my development inside of the virtual machine. This affords me two tremendous benefits: 1) If I accidentally break a machine, I can restore to a previous snapshot and 2) I can perform local debugging and step through the code. From here, I complete the entire development of the new feature or solution and then create a solution file to deploy to a development network running SharePoint in a similar configuration as our production systems. This gives me a chance to work with real data in a scratch-pad environment.

The final step occurs after testing and Q&A have been completed on the newly developed solution in the development network. This is where we deploy the solution to production servers and begin using it.

If you don't have the capability of using VMWare Workstation 6.0, you can substitute either Microsoft Virtual PC or Microsoft Virtual Server R2. Both of these are solid products and will still allow you to build a virtual environment for development.

If a team based development environment is needed, I would highly recommend reading this MSDN article by Eric Charran. It details the concepts needed for creating a team based development strategy.

26 October 2007

Information Architecture Planning Sheets

It's not often that you come across tools that can be used to both educate users and plan implementation at the same time, however, Mark Miller has successfully accomplished this with his Site Planning Worksheets. I am beginning to explore the use of these with the training department at my place of work for both their educational and developmental potential.

My organization has been offering training to our users for around two months now, and each time they leave a training session, new ideas are hatched that could be implemented in SharePoint. These ideas range from simplistic site designs with a few standard lists and attached workflows to entire systems that are supported and maintained through SharePoint. However, after a few weeks, the "new" wears off and the user forgets the original idea.

With these worksheets, I hope to capture these ideas and place them into a queue for better analysis of the business problems my users are attempting to solve. This way -- even if the new wears off -- our development team can better serve the user community with timely and accurate solutions. Through the process of requirements gathering, we will refine the final solution and be better able to deliver a solution that is up to the expectations of the user.

I would highly recommend to anyone that is involved in a roll-out of SharePoint to review these worksheets. They have benefits to all levels of user -- administrator, developer and end-user.

19 September 2007

Event Receiver Values

For those of you that need a quick conversion of the event receiver types, here they are:

  • SPEventReceiverType.ItemAdding = 1
  • SPEventReceiverType.ItemUpdating = 2
  • SPEventReceiverType.ItemDeleting = 3
  • SPEventReceiverType.ItemCheckingIn = 4
  • SPEventReceiverType.ItemCheckingOut = 5
  • SPEventReceiverType.ItemUncheckingOut = 6
  • SPEventReceiverType.ItemAttachmentAdding = 7
  • SPEventReceiverType.ItemAttachmentDeleting = 8
  • SPEventReceiverType.ItemFileMoving = 9
  • SPEventReceiverType.FieldAdding = 101
  • SPEventReceiverType.FieldUpdating = 102
  • SPEventReceiverType.FieldDeleting = 103
  • SPEventReceiverType.SiteDeleting = 201
  • SPEventReceiverType.WebDeleting = 202
  • SPEventReceiverType.WebMoving = 203
  • SPEventReceiverType.ItemAdded = 10001
  • SPEventReceiverType.ItemUpdated = 10002
  • SPEventReceiverType.ItemDeleted = 10003
  • SPEventReceiverType.ItemCheckedIn = 10004
  • SPEventReceiverType.ItemCheckedOut = 10005
  • SPEventReceiverType.ItemUncheckedOut = 10006
  • SPEventReceiverType.ItemAttachmentAdded = 10007
  • SPEventReceiverType.ItemAttachmentDeleted = 10008
  • SPEventReceiverType.ItemFileMoved = 10009
  • SPEventReceiverType.ItemFileConverted = 10010
  • SPEventReceiverType.FieldAdded = 10101
  • SPEventReceiverType.FieldUpdated = 10102
  • SPEventReceiverType.FieldDeleted = 10103
  • SPEventReceiverType.SiteDeleted = 10201
  • SPEventReceiverType.WebDeleted = 10202
  • SPEventReceiverType.WebMoved = 10203
  • SPEventReceiverType.EmailReceived = 20000
  • SPEventReceiverType.ContextEvent = 32766
  • SPEventReceiverType.InvalidReceiver = -1
This was something I had to do in order to build my ElementManifest.xml file for a feature that I was recently developing. In the SDK it mentions that I need to use the integer value of the SPEventReceiverType enumeration. When you click on the provided hyperlink, you see a list of the enumerations without an integer value -- hopefully this will help those needing this list.

10 September 2007

My First Custom Site Definition

Another recent project has lead me down the path of creating custom site definitions for use within my organization. My requirements are as follows:

  1. Must be based off the current team site definition
  2. Must include a PowerPoint slide library with example slides (required MOSS standard)
  3. Must include a picture library with example photographs
  4. Must remove SharePoint branded logo and use company logo instead
  5. Should include custom announcements on the front page
  6. Should provide links to common staff resources

So, the first thing I did was to download the VS 2005 Extensions for SharePoint Services 3.0. Once installed on my development server, I created a new project based off the Team Site Definition included as part of the newly installed VS 2005 Extensions for SharePoint Services 3.0.

TSD

When the project is created, the project automatically opens up the onet.xml file that needs to be modified to create the additional lists. I need to include two new lists that are not part of the original definition for a team site. This includes a picture library and a slide library. Find the Lists element in the onet.xml file and add two new entries:

<List Title="Shared Pictures"
         QuickLaunchUrl="Pictures/Forms/AllItems.aspx"
         Url="Pictures"
         Type="109"
         FeatureId="00bfea71-52d4-45b3-b544-b1c71b620109"/>
<List Title="Shared Slides"
         QuickLaunchUrl="Slides/Forms/AllItems.aspx"
         Url="Slides"
         Type="2100"
         FeatureId="0BE49FE9-9BC9-409d-ABF9-702753BD878D"/>

The first list item is based on type 109 which is the default picture library that is included as part of SharePoint. I have to include the feature that the list is based on as the FeatureId attribute. Notice that I have given a custom url instead of a url that includes a space. This should help my users with navigation to these libraries.

The second list took a little investigation. I opened up an explorer window and viewed the contents of <Program Files>/Common Files/Microsoft Shared/web server extensions/12/FEATURES folder and looked for the Slide Library feature. I opened the folder and then viewed the contents of the feature.xml file. I copied the GUID that was in the file and placed this as my GUID on the new list. I also noticed that the list type (from opening the referenced files in the elementmanifests node) was 2100. Now I have all I need to create a new Slide Library.

The next step was to add the necessary features to the WebFeatures node of the onet.xml file. Since both features need to be activated at the site level (and not the collection), I ignore the SiteFeatures node and made sure that my WebFeatures node included the following:

<WebFeatures>
     <Feature ID="00BFEA71-4EA5-48D4-A4AD-7EA5C011ABE5"/>
     <!-- TeamCollab Feature -->
     <Feature ID="F41CC668-37E5-4743-B4A8-74D1DB3FD8A4"/>
     <!-- MobilityRedirect -->
     <Feature ID="00bfea71-52d4-45b3-b544-b1c71b620109"/>
     <!-- Picture Library -->
     <Feature ID="0BE49FE9-9BC9-409d-ABF9-702753BD878D"/>
     <!-- Slide Library -->
</WebFeatures>

Now I have everything set up and can provision a site that will automatically include both a slide library and a picture library by default.

Next, I need to include some sample photos and slides for both of these new libraries. This is done using modules. You will notice there are two places in the onet.xml file that include a Modules node. The first one is included in the Configuration node and the second is in a Modules node outside of the Configuration Node. We need to include references to the new modules inside the Configuration node first.

So, simply add a new Module node for each of the new libraries. You can use the model already in-place for the Default module (this module includes the default.aspx page for the site and it's included web parts). I called my modules Images and Slides.

<Modules>
        <Module Name="Default"/>
        <Module Name="Images"/>
        <Module Name="Slides"/>
</Modules>

Now I move to the Modules node and define the contents of the Images and Slides modules.

    <Module Name="Images" Url="Pictures" Path="" List="109">
      <File Url="coastaltown.jpg" Type="GhostableInLibrary">
        <Property Name="Title" Value="Coastal Town"/>
        <Property Name="ImageCreateDate" Value="<ows:TodayISO/>"/>
        <Property Name="Description" Value="A nice quiet view of a coastal village as one might view on the Mediterranean sea."/>
      </File>
      <File Url="steamshed.jpg" Type="GhostableInLibrary">
        <Property Name="Title" Value="Old Steam Shed"/>
        <Property Name="ImageCreateDate" Value="<ows:TodayISO/>"/>
        <Property Name="Description" Value="An old logging shed powered by a steam furnace"/>
      </File>
    </Module>
    <Module Name="Slides" Url="Slides" Path="" List="2100">
      <File Url="SharePoint_Overview_Training_011.ppt" Type="GhostableInLibrary">
        <Property Name="Presentation" Value="SharePoint Overview Training" />
        <Property Name="Description" Value="What is the SharePoint?" />
      </File>
      <File Url="SharePoint_Overview_Training_174.ppt" Type="GhostableInLibrary">
        <Property Name="Presentation" Value="SharePoint Overview Training" />
        <Property Name="Description" Value="SharePoint Team Site Layout" />
      </File>
      <File Url="SharePoint_Overview_Training_175.ppt" Type="GhostableInLibrary">
        <Property Name="Presentation" Value="SharePoint Overview Training" />
        <Property Name="Description" Value="Global Links Bar" />
      </File>
    </Module>

You must set the file type attribute to GhostableInLibrary or the items will not be displayed in your libraries. Also, each Module node gives the files their destination location. This is done view that url attribute and the list attribute. I then set some properties on each of the items that I am including in these libraries using the Property nodes.

Now, to remove the SharePoint logo and add your own, I just need to make changes to the Default module. See the changes below:

    <Module Name="Default" Url="" Path="">
      <File Url="default.aspx" NavBarHome="True">
        <View List="$Resources:core,lists_Folder;/$Resources:core,announce_Folder;" BaseViewID="0" WebPartZoneID="Left"/>
        <View List="$Resources:core,lists_Folder;/$Resources:core,calendar_Folder;" BaseViewID="0" RecurrenceRowset="TRUE" WebPartZoneID="Left" WebPartOrder="2"/>
        <AllUsersWebPart WebPartZoneID="Right" WebPartOrder="1">
          <![CDATA[
                   <WebPart xmlns="http://schemas.microsoft.com/WebPart/v2" xmlns:iwp="http://schemas.microsoft.com/WebPart/v2/Image">
                        <Assembly>Microsoft.SharePoint, Version=12.0.0.0, Culture=neutral, PublicKeyToken=71e9bce111e9429c</Assembly>
                        <TypeName>Microsoft.SharePoint.WebPartPages.ImageWebPart</TypeName>
                        <FrameType>None</FrameType>
                        <Title>$Resources:wp_SiteImage;</Title>
                        <iwp:ImageLink>/PublishingImages/norm_logo.png</iwp:ImageLink>
                        <iwp:AlternativeText>Company Logo</iwp:AlternativeText>
                   </WebPart>
                   ]]>
        </AllUsersWebPart>
        <View List="$Resources:core,lists_Folder;/$Resources:core,links_Folder;" BaseViewID="0" WebPartZoneID="Right" WebPartOrder="2"/>
        <NavBarPage Name="$Resources:core,nav_Home;" ID="1002" Position="Start"/>
        <NavBarPage Name="$Resources:core,nav_Home;" ID="0" Position="Start"/>
      </File>
    </Module>

Now I have created the site definition, all I need to do is copy the files referenced in my modules to the Site Definition folder of my project. This will be compiled into the WSP solution file by the project. Keep in mind that these files will increase the overall size of your WSP solution file.

Now, I deploy the solution by right clicking on the project and choosing Deploy.

TSDDEPLOY

This will build my project files and automatically deploy it to the local sharepoint server. When I navigate to my site and choose to create a new site, my custom site definition is included under a newly created category, Development. When I provision the new site, it includes my new libraries and example files.

If you want to make changes to the category, just right click on the project and choose properties. Then you can click on the SharePoint Solution tab and make modifications to the solution and site definition files from here.

06 September 2007

Using Web Services in SharePoint Designer

I recently had a project in which I needed to create a course roster management system for our faculty to view a list of students in their class. We had already created a web service for the management of these courses for an older system, but since we have been moving towards SharePoint, when it was time to redesign this application we found SharePoint to be a strong candidate.

First, I created a new blank team site in SharePoint as my scratch pad. I connected to the site using SharePoint Designer and created two new ASPX pages. One would by my faculty course roster that included all of the courses the member was teachinng for the semester (facultycourses.aspx). The second one would have a list of students for a single course (courseroster.aspx).

Next, I opened up my data sources and added a new XML Web Service data source. I pointed the web service to my roster management course list by typing the URL in the top box. Since I'm only reading data for display, I will only need to configure the Select data command. I then selected the operation that returns a list of courses for a specified faculty member. I have one parameter that the webservice expects, Login. I specified a default value (for testing) and then checked the checkbox for The value of this parameter can be set via a Web Part connection. This allows me to use parameters in a data view to dynamically query the web service. Since this web service is used to both return courses and student rosters, I created a copy of the web service and pointed to the method that returns a list of students based on a specified course.

datasourceprops

soapenvelopNext, from the Data Source that returns a list of courses, I right clicked and selected Show Data. This performed a query to the web service and returned the schema of the data. I select the fields I want to display and then click on Insert Selected Fields as > Multiple Item View. This inserts a data view with the selected items. I now have the data ready for some modifications. The first thing I need to do is add a link to the student roster page, so I selected the column for the name of my course. From the Insert Menu, I chose HTML > Hyperlink. When I am prompted for properties, I provided the url StudentRoster.aspx?SYN={SYN}.

Next, I selected the dataview and then clicked on Data View > Parameters. In the dialog I have a parameter named Login. I clicked on the parameter and set the source to a query string. (My eventual goal for the finished application is to have SharePoint pass this information to the data view parameter. I'll let you know when I figure out how to accomplish this). Now I'm ready to move on to the StudentRoster page to get it setup.

facultypagerough

For the student roster, I follow the same instructions but set my data source to the data source that returns students in a course. I need to set the parameters for the data view to use a query string value that I set in the course link. This is the value SYN. After I save the page, I can now click on any course from the faculty courses page and display the students for that course.

Finally, to get these pages integrated into SharePoint, on each page I choose Format > Mater Page > Attach Master and use all of the defaults. This will wrap the sharepoint master page around the ASPX file and thus integrate this mini-application into sharepoint.

attachmaster

Here's my faculty page final result:

facultypagedone

23 August 2007

Lists.asmx Serialization

I was recently posed with the question of managing some of our HR open positions using SharePoint while having the ability to display these open positions on our external website. This sent me down a path that has given me some great understanding of the SharePoint Lists Web Service.

The first thing I wanted to do is make sure that I don't spend a lot of time recreating classes for use on this project. I imagine that at some point in the future someone else will approach me about presenting a list of their data on our external web site (or for use by an internal application). So, the first goal is to get as much reuse as possible. This is where I discovered some of the power of Generics for the first time.

As usual, I started with a search of the web and discovered this article. This was exceptional information and thus allowed me to begin to understand how I might accomplish my mission.

So, following the pattern of this article I assembled a SharepointListItems class that would be the basis for all sharepoint list data retrieved from the Lists Web Service (http://server/_vti_bin/lists.asmx). Here is the code for the SharepointListItems class (it's in VB because this is our language at work)

SharepointListItems.vb

Imports System.Xml
Imports System.Xml.Serialization
Imports System.Text
Imports System.Collections.Generic
Imports System

<XmlRoot(ElementName:="listitems", Namespace:="http://schemas.microsoft.com/sharepoint/soap/")> _
Public Class SharepointListItems(Of T As BaseListItem)
    Private rows As RowData(Of T) = Nothing

    <XmlElement(ElementName:="data", Namespace:="urn:schemas-microsoft-com:rowset")> _
    Public Property RowData() As RowData(Of T)
        Get
            Return rows
        End Get
        Set(ByVal value As RowData(Of T))
            rows = value
        End Set
    End Property

    Public Shared Function FromXml(ByVal xmlNode As String) As SharepointListItems(Of T)
        Dim xs As New XmlSerializer(GetType(SharepointListItems(Of T)))
        Dim xtr As New XmlTextReader(xmlNode, XmlNodeType.Element, Nothing)
        Dim o As Object = xs.Deserialize(xtr)
        xtr.Close()
        Return DirectCast(o, SharepointListItems(Of T))
    End Function
End Class


All of the work for this class is being handled through the shared function FromXML. This allows me to make a simple method call to get my results as a group of objects.

Next, I built the RowData class to hold a reference for the <rs:data> element. This class is also a generic class so I can hold a specified list of items

RowData.vb

Imports System.Xml
Imports System.Xml.Serialization
Imports System.Text
Imports System.Collections.Generic
Imports System

<XmlRoot(ElementName:="listitems", Namespace:="http://schemas.microsoft.com/sharepoint/soap/")> _
Public Class SharepointListItems(Of T As BaseListItem)
    Private rows As RowData(Of T) = Nothing

    <XmlElement(ElementName:="data", Namespace:="urn:schemas-microsoft-com:rowset")> _
    Public Property RowData() As RowData(Of T)
        Get
            Return rows
        End Get
        Set(ByVal value As RowData(Of T))
            rows = value
        End Set
    End Property

    Public Shared Function FromXml(ByVal xmlNode As String) As SharepointListItems(Of T)
        Dim xs As New XmlSerializer(GetType(SharepointListItems(Of T)))
        Dim xtr As New XmlTextReader(xmlNode, XmlNodeType.Element, Nothing)
        Dim o As Object = xs.Deserialize(xtr)
        xtr.Close()
        Return DirectCast(o, SharepointListItems(Of T))
    End Function
End Class


Finally, I needed my base class that I would use to capture common list items. This class uses the XmlAttribute attribute to map the contents of the returned Xml to the object's properties.

BaseListItem.vb

Imports System.Xml
Imports System.Xml.Serialization
Imports System.Text
Imports System.Collections.Generic
Imports System

Public Class BaseListItem
    Protected _id As Integer = 0
    Protected _attachments As Integer = 0
    Protected _hiddenVersion As Integer = 0
    Protected _linkTitle As String = String.Empty
    Protected _title As String = String.Empty

    Public Sub New()

    End Sub

    <XmlAttribute("ows_Title")> _
    Public Property Title() As String
        Get
            Return _title
        End Get
        Set(ByVal value As String)
            _title = value
        End Set
    End Property

    <XmlAttribute("ows_Attachments")> _
    Public Property AttachmentCount() As Integer
        Get
            Return _attachments
        End Get
        Set(ByVal value As Integer)
            _attachments = value
        End Set
    End Property

    <XmlAttribute("ows_owshiddenversion")> _
    Public Property HiddenVersion() As Integer
        Get
            Return _hiddenVersion
        End Get
        Set(ByVal value As Integer)
            _hiddenVersion = value
        End Set
    End Property

    <XmlAttribute("ows_ID")> _
    Public Property ID() As Integer
        Get
            Return _id
        End Get
        Set(ByVal value As Integer)
            _id = value
        End Set
    End Property

    <XmlAttribute("ows_LinkTitle")> _
    Public Property LinkTitle() As String
        Get
            Return _linkTitle
        End Get
        Set(ByVal value As String)
            _linkTitle = value
        End Set
    End Property
End Class


Now I am ready to begin my project of importing job listings from my HR site into objects that I can use on the external website (or other applications). This object inherits it's functionality from the BaseListItems class and extends the functionality to include items specific to this list.

JobListing.vb

Imports EAS.SharepointListWebService
Public Class JobListing
    Inherits BaseListItem

    Private _PositionType As String
    Private _PostingDepartment As String
    Private _Description As String
    Private _ContactPerson As String

    Public Sub New()

    End Sub

    <XmlAttribute("ows_Position Type")> _
    Public Property PositionType() As String
        Get
            Return _PositionType
        End Get
        Set(ByVal value As String)
            _PositionType = value
        End Set
    End Property

    <XmlAttribute("ows_Posting Department")> _
    Public Property Department() As String
        Get
            Return _PostingDepartment
        End Get
        Set(ByVal value As String)
            _PostingDepartment = value
        End Set
    End Property

    <XmlAttribute("ows_Description")> _
    Public Property Description() As String
        Get
            Return _Description
        End Get
        Set(ByVal value As String)
            _Description = value
        End Set
    End Property

    <XmlAttribute("ows_Contact Person")> _
    Public Property ContactPerson() As String
        Get
            Return _ContactPerson
        End Get
        Set(ByVal value As String)
            _ContactPerson = value
        End Set
    End Property
End Class


NOTE: I discovered that the _x0020_ convention used for the returned attributes will actually cause problems. If you'll notice, I have some attributes that look like ows_Contact Person instead of the expected ows_Contact_x0020_Person.

Now for the implementation of the code. Here's how I use the code in my application to populate a group of objects.

GetData Function

    Private Sub GetJobData(ByVal username As String, ByVal password As String)
        Dim CAMLDoc As New XmlDocument
        Dim ndQuery As XmlNode = CAMLDoc.CreateElement("Query")
        Dim HR As New HRListsWebService.Lists

        ndQuery.InnerXml = "<Where>" & _
                           "<And>" & _
                           "<Eq>" & _
                           "<Value Type='Text'>Open - Approved</Value>" & _
                           "<FieldRef Name='Open'></FieldRef>" & _
                           "</Eq>" & _
                           "<Eq>" & _
                           "<Value Type='Integer'>1</Value>" & _
                           "<FieldRef Name='List_x0020_On_x0020_External_x00'></FieldRef>" & _
                           "</Eq>" & _
                           "</And>" & _
                           "<OrderBy>" & _
                           "<FieldRef Ascending='TRUE' Name='Posting Department'/>" & _
                           "</OrderBy>" & _
                           "</Where>"

        Dim results As SharepointListItems(Of JobListing)

        Try
            HR.Credentials = New System.Net.NetworkCredential(userName, password)
            Dim ndListItems As XmlNode = HR.GetListItems("Open Positions List", String.Empty, ndQuery, Nothing, String.Empty, Nothing, Nothing)
            results = SharepointListItems(Of JobListing).FromXml(ndListItems.OuterXml)
        Catch ex As Exception
            Throw New Exception("Unsuccessful query to the SharePoint web service.", ex)
        End Try

        _JobListItems = results
    End Sub


I hope this helps someone out there working with lists. I'm open to suggestions as I'm still learning how this really works!

21 August 2007

Office Authentication Prompt in Vista for Sharepoint Documents

I recently ran across a problem with the Vista clients on my network being prompted for user credentials each time they opened a document from a document library -- even though they were already authenticated to the portal. With some help from my network administrator, we were able to find a solution that seems to work well. The information for this fix was posted here. We implemented solution 2 into our network and everything has been humming along perfectly. Hope this helps someone stuck with this problem!

16 June 2007

Updating and Enumerating User Profiles in MOSS

Recently, we came across a situation in our environment in which we needed to enumerate all profiles in MOSS 2007 and add a few new profile properties. One of the properties that needed to be updated is the picture url. All of our employees pictures are located in a separate database and an image handler has already been created to serve out the images. So, we wanted to leverage this to place user pictures into the directory (and turn off the user's ability to modify them).

This project is a service that will run on my MOSS server a pre-determined intervals. I will eventually add it to SharePoint as a timer job to be done just after the user profile import has completed.

So, here's the code that made it work:

Imports Microsoft.SharePoint Imports Microsoft.Office.Server.UserProfiles Imports Microsoft.Office.Server
Module UserProfileUpdaterService
Sub Main()
Dim currentSite As New SPSite("http://mymossserver/") Dim context As ServerContext = ServerContext.GetContext(currentSite) Dim profileManager As New UserProfileManager(context)
For Each profile As UserProfile In profileManager
' Get profile properties Dim FirstNameProp As UserProfileValueCollection = profile.Item("FirstName") Dim LastNameProp As UserProfileValueCollection = profile.Item("LastName") Dim ImageProp As UserProfileValueCollection = profile.Item("PictureURL")
' Get string values from the properties Dim FirstName As String = FirstNameProp.Item(0) Dim LastName As String = LastNameProp.Item(0) Dim PictureURL As String = ImageProp.Item(0)
' Set a new picture URL PictureURL = String.Format("http://imageserver/GetEmployeeImage.ashx?" & _ "e={0}",GetEmployeeID(FirstName,LastName))
' Set the image property and commit the changes ImageProp.Item(0) = PictureURL profile.Commit()
Next
End Sub
End Module

First, we need to get a SPSite. This is done by creating a new instance of SPSite passing the site URL to the constructor. Next, we have to pass the site context to the user profile manager's constructor. Then we can iterate through all profiles and retrieve properties of the profile. Each property is returned as a UserProfilePropertyValueCollection. You can get an individual property by calling Prop.Item("PropertyName"). This will return an array of objects. Since most of the properties I'm working with are strings, there's not much of a need to cast them to other object types. Finally, I query the database with the method GetEmployeeID(FirstName,LastName) (which I have not detailed here) and write the values back into the image property using ImageProp.Item(0)=PictureURL. To write the changes to the profile, I finally call profile.Commit.

Hope this simple example can help some of you make necessary changes to your user profile stores in MOSS 2007.

06 June 2007

10 Things I Despise about SharePoint Workflows

Okay, I'm fed up with the lack of documentation and examples for sharepoint workflows. Here are the top ten things that are bugging me about this: 1) Incomplete documentation 2) Sparse or overly complex examples 3) Few experts and community support 4) Weakly integrated tools (both SharePoint designer and VS 2005) 5) Disconnected assumptions about workflow forms (association, initialization and modification) 6) Extremely poorly documented examples of state machine workflows 7) Poor information on creating deployment solutions 8) Continually recursive looping of some workflows with no blocking mechanizm 9) Single instance workflows removing previous historical information 10) Examples are primarily in C# and are difficult to translate to my VB programmers. There... I've said it. I'm ready to learn more and begin building solutions, but until these top ten items are resolved, it will be difficult treading. The problem -- I have 3 weeks to complete a complex workflow problem! Grr...

12 April 2007

Loading Values in a Custom List Form

One of the biggest challenges I've have faced is the development of custom list forms that are able to import values from parameters. In this demonstration, I am going to demonstrate how I was able to accomplish the goal of creating a custom list form that takes in parameters from another list's display form. So, without further delay, let's get started. The scenario that I'm working with may be useful to some of you out there who need to maintain a software library. Our organization stores all software in a central vault and items are signed-in and signed-out by our help desk personnel. Before we begin, we need to create the site and the lists that will be involved in this application. I plan to export this site into a site definition in the future, so a blank slate is a good way to being. We will need to first create a new blank site in SharePoint. Click on View All Site Content > Create > Sites and Workspaces. Give the site a title, and specify the url. Pick the Blank Site template and then click on create. On this new blank site, we need to create two lists. Do this be clicking on View All Content > Create > Custom List. The first list we will call Software Library. Provide a description for the list if you like. Next, we need to create the fields for this list. For simplicity, I will include the primary fields for this item. To create columns for this list, open the list and then click on Actions > List Settings. Under Column, click on Create Column. Here are the columns needed for this list.

  • Title, Required
  • Vendor, Required, Single line of text
  • Operating Systems, Required, Single line of text
  • Serial Number, Single line of text
  • Licenses, Required, Number, Default 1, Min 1
  • Copies, Required, Number, Default 1, Min 1

Now, create a new list called Check Out Log and add the following columns:

  • Title, Uncheck Required
  • Check Out Date, Required, Date and Time, Date Only, Default Today
  • Check Out By, Required, Person or Group, People Only, Multiple Selections: No, All Users, Show Field: Name.
  • Check In Date, Date and Time, Date Only
  • Software, Required, Lookup, Get Information From: Software Library, In This Column: ID

Now we have our basic lists to begin this exercise in SharePoint Designer. So now, open up SharePoint designer and open your site. Next, in the folder list, open DispForm.aspx under the list Software Library.

You will see the default web part used for displaying list item properties. Begin by right-clicking on the web part and choosing web-part properties. Under Layout, check the box for Close the web part. This will cause the web part to be hidden on our custom page.

Now, click below the closed web part and on the menu in SharePoint designer, click Insert > SharePoint Controls > Custom List Form. This will insert our custom list form that we are going to use to link the user to our updated form in the Check Out Log.

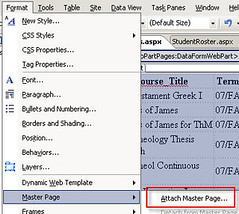
Now, in the header of the table type the text Check Out ItemCheck In Item as indicated above. Highlight Check Out Item and then click Insert > Hyperlink.

We need to create a formula to create our URI for the new form. For the address type {concat('../Check Out Log/CheckOut.aspx?SoftwareID=',/dsQueryResponse/Rows/Row/@ID)} and then click OK. This is an XSLT instruction that tells the processor to combine the values enclosed in single quotes. The result of this will be similar to ../Check Out Log/CheckOut.aspx?SoftwareID=1. Notice we are using a relative URL. By using a relative URL, if you have multiple access mappings all of your users will have access to the item no matter where it is located.

Lets do the same thing for Check In Item but enter {concat('../Check Out Log/CheckIn.aspx?SoftwareID=',/dsQueryResponse/Rows/Row/@ID)} for the address.

Most of this was pretty familiar in exploration. The part that I struggled with the most is what follows. Begin by right-clicking on the list Check Out Log and choose New > ASPX. Name the page CheckOut.aspx. You will notice there is nothing listed in this new page and no template has been applied to the page. We will correct this in a moment. Now, open the Data Source Library and right click on Check Out Log. Choose Show Data. You will see a screen with all of the SharePoint fields in this list. Notice there are many more fields than we initially specified on the creation of this list. In the list, click on Check Out Date and then hold down CTRL while clicking on Check Out By and Software. Click the drop down for Insert Selected Fields as and then choose New Item Form. This will create the New Item form we will be using to create new list items. Now we need to create take care of the parameters passed in our URI. If you remember, we created a URI that is similar to the following ../Check Out Log/CheckOut.aspx?SoftwareID=2. We need to instruct our new data view to capture the query string item SoftwareID. Click on the data view and on the menu click Data View > Parameters. Click on New Parameter and provide the name SoftwareID. For parameter source, choose QueryString and then type SoftwareID in the Query String Variable field. If you want, you can specify a default value. Click OK to close the dialog. Now we need to make a modification or two to the host form. Let's begin by associating the form with a master page. Click on Format > Master Page > Attach Master Page. Keep the default values and click OK until the master page is applied. Your page should now look more like your sharepoint site! The next thing we need to do is convert the default List Item Property for Software into a TextBox. To accomplish this, right click on the field and choose Format Item As > TextBox. Now we can handle our parameter we setup earlier. In the Tag Properties Task Pane, locate the Text property and then type {$SoftwareID}. This will set the value in the textbox to the value contained in the SoftwareID query string variable. The only thing left to do is hide the row containing the Software. In the markup bar find the tag for the row containing this control. In the Tag Properties Task Pane, location the style property and type display:none. This will hide our row from the user. Congratulations! We have now loaded a passed value into a custom list form. If you open your sharepoint site and then display the Software Library List. Add a new item and then click on the item in the list to show our customized display form. Click the Check Out Item link and you should see the custom new item form we just created. I know there are still some issues, for example, redirecting the user back to the original list, but this does work and you haven't had to write code. As I improve this technique, I will post my findings.