Showing posts with label SharePoint Designer. Show all posts

28 October 2009

Using XML Web Services in SharePoint Designer

I noticed that I had promised better details on a previous post, so I have decided to include step by step instructions on building a solution that queries an XML web service for data and displays that information in SharePoint 2007. I apologize that it has taken me two years to get back to this, and I hope you will still find this information valuable.

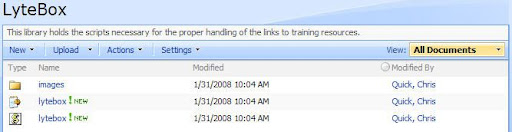
In the post, I described how I used SharePoint Designer to query an XML web service to build a course roster system for our professors. This is a very simple solution that allows a faculty member to go to SharePoint and display their courses and view the students enrolled in that course from data in our ERP system.

Starting in SharePoint designer, I open the site where this solution would be placed. The site I’m using has a Pages document library, but any document library should work.

image

I need two pages: one to display the available courses and another to display the students enrolled in the course. A page can be created by right clicking on the window and choosing new aspx page. Following this process, I create these two pages: CourseRoster.aspx and StudentsInCourse.aspx.

image

Now, the web service data sources need to be created. I begin by opening Manage Data Sources from the Data View menu. This opens the Data Source Library task pane. I locate the XML Web Services node and expand it. Next, I click on Connect to a web service…

image

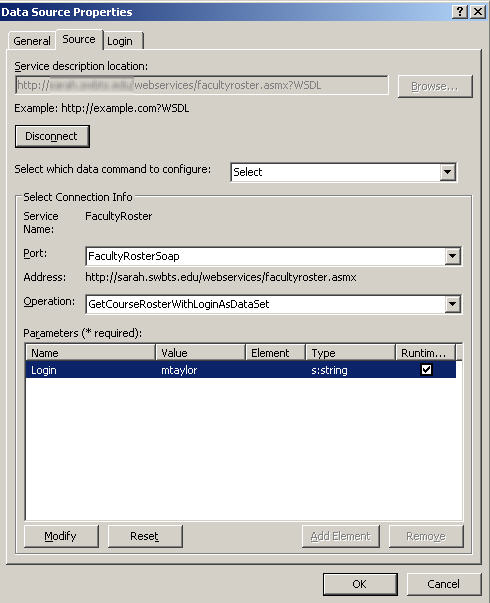
The data source properties window will open and show the Source Tab. To help identify this data source, I begin by going to the General Tab and providing a name that is more descriptive than the default one that will be created.

image

On the Source tab, I provide the details on how to contact the web service, connect to the web service by clicking on Connect Now and select the appropriate method. (Notice that you do have the ability to use web services to update data as well, but this is beyond the scope of this post.). Any parameters that are needed for the web service will be displayed in the parameters box at the bottom of the dialog.

image

So that I can customize the parameters sent to the web service, I need to make modifications to the parameters. I click on the parameters that will need to allow to be set dynamically and then click on Modify. In this case, the Login will need to be provided dynamically; However, for simplicity, I will only be using the default value for this data source.

When I click on Modify, the parameter properties dialog will open. I insure the checkbox for The value of this parameter can be set via a Web Part connection is checked and provide a default value to use for the initial query of the data source. When the values are set correctly, I click OK to close the dialog.

image

If the web service required authentication, I would change properties on the Login tab. Fortunately, the web service that I am using does not require authentication, so I click OK to create the new data source.

image

This data source will be used to get the list of courses for a specific professor. Since the same web service also has a method to get the students currently enrolled in the course, I can simply make a copy of this web service and modify the settings appropriately.

To do this, I right click on the web service I just created and choose Copy and Modify. Again, I change the name on the general tab to provide a better name for the data source. In my case, this one is called StudentsInCourseWebService. On the source tab, I click reconnect and choose the new method to use. Again, I need to modify the parameters. This web service method expects a parameter named SYN. This is the unique identifier of a course in our organization, so it will need to be provided dynamically.

image

Now I have both of my web service data sources ready, it’s time to use the data! First, I open the CourseRoster.aspx page in SharePoint designer. A blank ASP.NET page is displayed. With the page active, I open the data source library task pane and locate the data source that queries the courses for the current professor. I right click on it and choose Show Data.

image

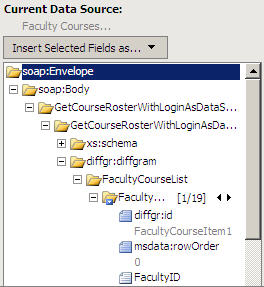
This queries the web service using the default value and returns the results in the Data Source Details task pane. Now, I CTRL-Click on all the fields that will need to be displayed on the data source and then click on Insert Selected Fields as… > Multiple Item View

image

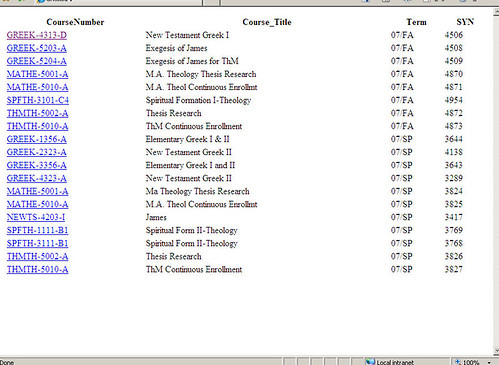
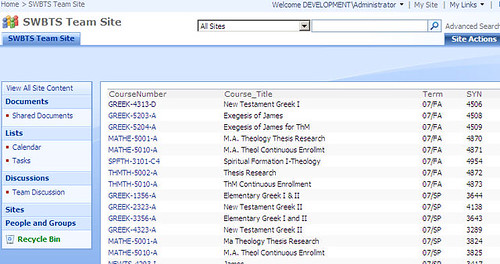
The CourseRoster.aspx page now displays a list of available courses using the default value provided to the web service.

image

I want the professor to be able to click on the course number to open the course and view currently enrolled students. To do this, I move the mouse cursor over one of the items in the CourseNumber row and look for the task widget (I’m not sure what the actual name of it is, but it’s a little gray arrow).

image

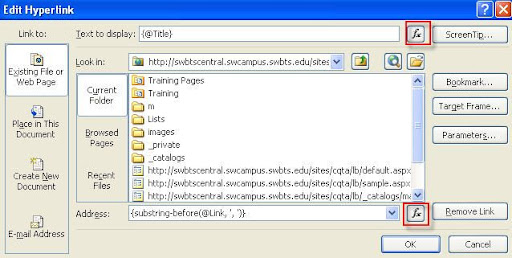
I click on the widget and the properties of this field are be displayed. I need this to be a hyperlink, so I choose Hyperlink in the Format As dropdown.

image

A message warning me hyperlinks should only be used in a trusted environment appears. I click Yes to confirm the creation of a hyperlink and the hyperlink properties window is displayed. I will leave the text to display as {CourseNumber}, but I need to change the Address to StudentsInCourse.aspx?SYN={SYN}. I confirm this by clicking on OK.

image

I now move to the StudentsInCourse.aspx page and make sure it is the active page in SharePoint designer. I reopen the Data Source Library task pane to locate the data source that gets the students in a specific course. Right clicking on it, as before, I choose to Show Data. Again, I choose the columns to display and click on Insert Selected Items As Multiple Item View. There is now a list of students for the default value provided in the data source. This is not the desired result, so I need to specify a source for the parameter. I locate the widget for the data source and click on Parameters.

image

The SYN parameter is available, I just need to specify the source. This is done be choosing Query String in the parameter source drop down and setting the Query String Variable to SYN.

image

Now, it’s time for testing. To insure that everything is working, I save everything and go back to the CourseRoster.aspx page and click on the preview button on the toolbar.

image

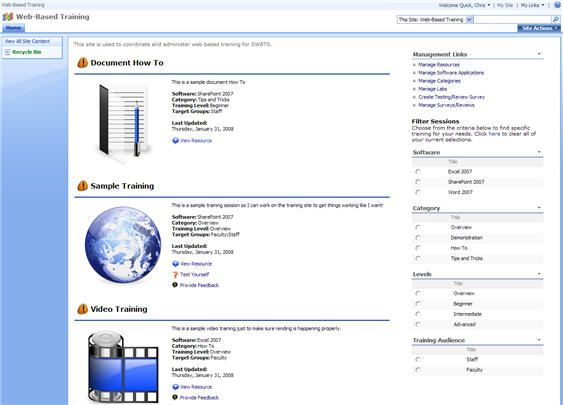
This opens Internet Explorer to the CourseRoster.aspx page with a list of courses. I can click on a specific course to view the students enrolled in the course.

image

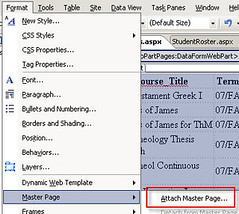
Finally, I need to apply the SharePoint master pages to these pages. To do this I go back to SharePoint Designer and click on Format > Master Page > Attach Master Page. I choose to attach the Default Master and match any content regions that need to be setup.

image

When completed, the page is now wrapped in SharePoint. I do the same thing for the StudentsInCourse.aspx page and the solution is now complete.

image

14 April 2008

Training Site Template Available for Download

As promised, here is the training site template available for download. Please be advised that this file is for demonstration purposes only. I am making it available to the community as an educational resource only, and therefore offer no support for the actual installation and use of the template. TrainingSiteTemplate on SkyDrive. Known Issues

  1. Opening in SharePoint Designer shows as unable to render. I have no idea why this happens, but hopefully it will be addressed by Microsoft at some time. The error message is non-descriptive at best and makes it difficult to troubleshoot.
  2. Web Part Connections have been removed In the original template, all of the items made use of web part connections to filter the main list of training resources. I continuously received error messages when provisioning a new site with established web part connections. I believe this may be another short-fall of SharePoint designer, as this has been my experience no matter how many different SharePoint deployments I've used.

Please feel free to comment on your experiences with this site definition. I hope it helps you envision a plan for your own templates and zero-code solutions.

01 February 2008

Create a Zero Code Web-Based Training Site

One of the best tips I've come across recently has been the use of a Creative Commons Attribution 3.0 License javascript library called LyteBox. This library allows you to incorporate some pretty cool effects into SharePoint using a simple content editor web part. Using this javascript library, a content editor web part and SharePoint Designer, my plan is to walk through creating a simple training site that gives users a Web 2.0 feel to training content.

First, download the scripts from the link above. After you have downloaded the scripts, create a new blank site. We're going to add our own lists and libraries to this site, so there is no need for us to have any existing content.

Getting LyteBox Setup

When you're new site has been provisioned, create a new document library called LyteBox and place all of the scripts and images into this library. Be sure to place all of the images in a new folder in this library called images.


Now, edit the page of your site and add a new content editor web part to top-right zone of the homepage (default.aspx). Edit the shared web-part and include the following lines using the source editor:

<script type="text/javascript" language="javascript" src="lytebox/lytebox.js"></script>
<link rel="stylesheet" href="lytebox/lytebox.css" type="text/css" media="screen" />

Change the Appearance of the web part and turn off the chrome. This way, the web part will not be displayed at all. If you'd like, export this web-part for reuse in other places in SharePoint.

Creating Training Libraries and Lists

Next, we need to create a few libraries and lists to use for our site. I need a library to contain basic HTML pages and resources for those pages, a list to create categories for the training labs and a list to contain the actual training labs.

Create a new document library called Resources and upload a few sample HTML pages (or create them with SharePoint Designer or a similar tool). This will be the place that you can upload all of the materials needed for your training labs. Our organization will be creating Camtasia projects for the users to review. You could include anything that is HTML based for your users in the library.

Next, create a custom list to contain a list of categories. I named this list Categories and added the following items: Excel 2007, Word 2007, SharePoint 2007. This list will be used as a lookup for categorizing your training sessions (and as a connected web-part for filtering the list of available labs).

Now, the next list is the "meat and potatoes" list because this is where you will be organizing the labs that are available. Create another custom list called Training Labs and add the following columns to the list:

  • Category, Lookup, Required -- linked to Categories - Title
  • Description, Multiline
  • Width, Number
  • Height, Number
  • Resource Link, HyperLink/Picture -- set to hyperlinks

At this point, you may want to create some items for testing when we get into SharePoint designer. The idea is each item will provide a link to the resource using the resource link column. This will be linked to an HTML page in the Resources library. The width and height columns will be used to control how large the LyteBox window becomes using some cool SharePoint designer items.

Now the basic lists are available and ready to use for your site. Its time to start wiring up all the pieces with SharePoint Designer.

SharePoint Designer

Open the site using SharePoint designer and then double click default.aspx to open the page. In the toolbox (or click Task Panes), go to the Data Source Library and locate the Training Labs list. Click on the list and choose Show Data. In the list, highlight the title column and drag this over to the default.aspx page right zone. Drop it in place below the content editor we placed in the page earlier.

Now, using the Common Data View Tasks Widget, modify the columns you wish to display. I added in the description and category fields to my display. Click on the widget for the title column and change it into a hyperlink column. For the hyperlinks properties, make sure the Text to Display is set to {@Title} and the Address is set to {substring-before(@Resource_x0020_Link,', ')}. The easiest way to do this is to click on the Fx button for Address and choose the Resource Link from the list and then do the same for the Text to display.


Now for the fun part. You will need to make some modifications to the tag properties of the hyperlink so the LyteBox script will execute on the link. In the rel attribute, set it to lyteframe. Then locate the rev attribute and choose the function box. Make sure to use the following function in the dialog:

concat('width: ',@Width,'px; height: ',@Height,'px; scrolling: no;') 

Now, your properties should look something like the following:


You should be ready to save your page and begin testing it out. If you have been successful, your resources should load up in a Web 2.0 feeling box that dims the surrounding area and displays the content in the box.

Filtering Content

The final step to make this site more useful is to allow your users to filter the content based on the category. To do this, in SharePoint, edit your page and add a web part for your Categories list to the Right zone (you can also do this from inside of SharePoint Designer, but I prefer SharePoint's ability to set the properties of the web part).

Go back into SharePoint designer and reload the page. Right click on your Categories Web Part and choose Web Part Connections.

  • Set the connection to Provide Row To and click Next.
  • Choose to Connect to a Web Part on this Page and click Next.
  • Choose the Target Web Part as your Training Labs DataView and the Target Action to Get Filter Values From
  • Match up the columns between the Categories List and the Training Labs List. This should be to set the Categories List to Title on the same row as the Training Labs category row.
  • Click on Finish.

Now save the page and load it up in your Browser. Test that the filter gets applied and you can now review training labs based on the way your filter is set.

I'll see if I can't upload the template I've created for you to dissect and play with. My final template looks like the following:


23 January 2008

ExpGroupBy(obj) Javascript Function

There are times that I am glad to be a SharePoint developer. Today is one of those days! I have been working on a web part that needs to roll-up a lot of data from multiple sub-sites for a dashboard style view. The view needs to group the data by two separate criteria (Unit and Category). Additionally, the desire of the project sponsor is to have all of the items be in a collapsed view with the ability to expand those items on demand. I begin thinking to myself, "Great -- I get to play with Javascript!" Now, repeat that statement with as much sarcasm as you can muster and you have a good idea of my state of mind.

I then remember that I can use SharePoint Designer to create a view similar to my target view. Okay, let's create a list and add several items to it. I now have my "test data" to begin my experiments. Opening up SharePoint Designer, I create a dataview of my list and then specify two levels of grouping. I save the page and then open up the page in IE.

I play with the grouping and find that it is exactly how I want to implement this functionality for my client. So, the fun work of dissecting code begins. During my investigation, I notice that there is a call to a javascript function ExpGroupBy being issued when I click on the handy 'plus' and 'minus' images. After further investigation, I learn that this is a function available in the core.js script file. Hurray! I can use this!

So, I make the necessary modifications to my web site and create my headers and footers for each group, assign unique ID's and then test it in IE... crash! The javascript doesn't work. Here's a sample of the table I was using:

<tr id="group0" style="display: block">
<td class="ms-gb" style="background: #cccccc;" colspan="8">
<a href="javascript:" onclick="javascript:ExpGroupBy(this);return false;">
<img src="/_layouts/images/minus.gif" border="0" alt="expand" name="collapse"></a>
UNIT 10000</td>
</tr>
<tr id="group1" style="display: none;">
<td class="ms-gb" style="background: #cccccc;" colspan="8">
<a href="javascript:" onclick="javascript:ExpGroupBy(this);return false;"><img src="/_layouts/images/minus.gif" border="0" alt="expand" name="collapse"></a>PERSONNEL EXPENSE</td>
</tr>
<tr>
<th class="ms-vh">Cost Center</th>
<th class="ms-vh">Description</th>
<th class="ms-vh">Prev. Budget</th>
<th class="ms-vh">Prev. Actual</th>
<th class="ms-vh">Current Budget</th>
<th class="ms-vh">YTD Actual</th>
<th class="ms-vh">Proposed Budget</th>
<th class="ms-vh">Increase/Descrease</th>
</tr>
<tr class="ms-alternating" style="display: none;">
<td>
10-10000-1000002</td>
<td>
<a href="http://sharepointdev/sites/budgtest/10000/Lists/Cost Centers/EditForm.aspx?ID=3&Source=/sites/budgtest/Shared Documents/Centers.aspx">Sample Cost Center</a></td>
<td align="right">
$25,365.00</td>
<td align="right">
$25,365.00</td>
<td align="right">
$25,365.00</td>
<td align="right">
$4,289.39</td>
<td align="right">
$0.00</td>
<td align="right">
$29,500.00</td>
</tr>

.....

<tr id="group2" style="display: none"><td class="ms-gb" style="background: #cccccc;" colspan="2"> PERSONNEL EXPENSE Totals: </td> <td class="ms-gb" style="background: #cccccc;" align="right"> $439,370.00</td> <td class="ms-gb" style="background: #cccccc;" align="right"> $439,370.00</td> <td class="ms-gb" style="background: #cccccc;" align="right"> $439,370.00</td> <td class="ms-gb" style="background: #cccccc;" align="right"> $141,865.06</td> <td class="ms-gb" style="background: #cccccc;" align="right"> $0.00</td> <td class="ms-gb" style="background: #cccccc;" align="right"> $29,500.00</td> </tr> <tr id="group3" style="display: none"><td class="ms-gb" style="background: #cccccc;" colspan="2"> PERSONNEL EXPENSE Totals: </td> <td class="ms-gb" style="background: #cccccc;" align="right"> $439,370.00</td> <td class="ms-gb" style="background: #cccccc;" align="right"> $439,370.00</td> <td class="ms-gb" style="background: #cccccc;" align="right"> $439,370.00</td> <td class="ms-gb" style="background: #cccccc;" align="right"> $141,865.06</td> <td class="ms-gb" style="background: #cccccc;" align="right"> $0.00</td> <td class="ms-gb" style="background: #cccccc;" align="right"> $29,500.00</td> </tr>

So I loaded this up in IE and to my surprise it ALMOST worked. When I clicked on the unit expand/collapse, the entire table would be collapsed from that place. So if I had multiple units, I would only see a single unit. The same thing would happen if I collapsed a category -- all units and categories below would also collapse.

After further investigation, I learned that the function works by examining the ID of the table row containing the group header and footer. This is how it determines the current level you are viewing to collapse the correct items. So, for my example I needed two group ID's, group0 and group1. Each first level group row header/footer (Unit) was assigned the ID group0 while all second level group rows header/footer (Category) were assigned the ID group1. Once I figured this out, the function began working properly!

06 September 2007

Using Web Services in SharePoint Designer

I recently had a project in which I needed to create a course roster management system for our faculty to view a list of students in their class. We had already created a web service for the management of these courses for an older system, but since we have been moving towards SharePoint, when it was time to redesign this application we found SharePoint to be a strong candidate.

First, I created a new blank team site in SharePoint as my scratch pad. I connected to the site using SharePoint Designer and created two new ASPX pages. One would by my faculty course roster that included all of the courses the member was teachinng for the semester (facultycourses.aspx). The second one would have a list of students for a single course (courseroster.aspx).

Next, I opened up my data sources and added a new XML Web Service data source. I pointed the web service to my roster management course list by typing the URL in the top box. Since I'm only reading data for display, I will only need to configure the Select data command. I then selected the operation that returns a list of courses for a specified faculty member. I have one parameter that the webservice expects, Login. I specified a default value (for testing) and then checked the checkbox for The value of this parameter can be set via a Web Part connection. This allows me to use parameters in a data view to dynamically query the web service. Since this web service is used to both return courses and student rosters, I created a copy of the web service and pointed to the method that returns a list of students based on a specified course.

datasourceprops

soapenvelopNext, from the Data Source that returns a list of courses, I right clicked and selected Show Data. This performed a query to the web service and returned the schema of the data. I select the fields I want to display and then click on Insert Selected Fields as > Multiple Item View. This inserts a data view with the selected items. I now have the data ready for some modifications. The first thing I need to do is add a link to the student roster page, so I selected the column for the name of my course. From the Insert Menu, I chose HTML > Hyperlink. When I am prompted for properties, I provided the url StudentRoster.aspx?SYN={SYN}.

Next, I selected the dataview and then clicked on Data View > Parameters. In the dialog I have a parameter named Login. I clicked on the parameter and set the source to a query string. (My eventual goal for the finished application is to have SharePoint pass this information to the data view parameter. I'll let you know when I figure out how to accomplish this). Now I'm ready to move on to the StudentRoster page to get it setup.

facultypagerough

For the student roster, I follow the same instructions but set my data source to the data source that returns students in a course. I need to set the parameters for the data view to use a query string value that I set in the course link. This is the value SYN. After I save the page, I can now click on any course from the faculty courses page and display the students for that course.

Finally, to get these pages integrated into SharePoint, on each page I choose Format > Mater Page > Attach Master and use all of the defaults. This will wrap the sharepoint master page around the ASPX file and thus integrate this mini-application into sharepoint.

attachmaster

Here's my faculty page final result:

facultypagedone

12 April 2007

Loading Values in a Custom List Form

One of the biggest challenges I've have faced is the development of custom list forms that are able to import values from parameters. In this demonstration, I am going to demonstrate how I was able to accomplish the goal of creating a custom list form that takes in parameters from another list's display form. So, without further delay, let's get started. The scenario that I'm working with may be useful to some of you out there who need to maintain a software library. Our organization stores all software in a central vault and items are signed-in and signed-out by our help desk personnel. Before we begin, we need to create the site and the lists that will be involved in this application. I plan to export this site into a site definition in the future, so a blank slate is a good way to being. We will need to first create a new blank site in SharePoint. Click on View All Site Content > Create > Sites and Workspaces. Give the site a title, and specify the url. Pick the Blank Site template and then click on create. On this new blank site, we need to create two lists. Do this be clicking on View All Content > Create > Custom List. The first list we will call Software Library. Provide a description for the list if you like. Next, we need to create the fields for this list. For simplicity, I will include the primary fields for this item. To create columns for this list, open the list and then click on Actions > List Settings. Under Column, click on Create Column. Here are the columns needed for this list.

  • Title, Required
  • Vendor, Required, Single line of text
  • Operating Systems, Required, Single line of text
  • Serial Number, Single line of text
  • Licenses, Required, Number, Default 1, Min 1
  • Copies, Required, Number, Default 1, Min 1

Now, create a new list called Check Out Log and add the following columns:

  • Title, Uncheck Required
  • Check Out Date, Required, Date and Time, Date Only, Default Today
  • Check Out By, Required, Person or Group, People Only, Multiple Selections: No, All Users, Show Field: Name.
  • Check In Date, Date and Time, Date Only
  • Software, Required, Lookup, Get Information From: Software Library, In This Column: ID

Now we have our basic lists to begin this exercise in SharePoint Designer. So now, open up SharePoint designer and open your site. Next, in the folder list, open DispForm.aspx under the list Software Library.

You will see the default web part used for displaying list item properties. Begin by right-clicking on the web part and choosing web-part properties. Under Layout, check the box for Close the web part. This will cause the web part to be hidden on our custom page.

Now, click below the closed web part and on the menu in SharePoint designer, click Insert > SharePoint Controls > Custom List Form. This will insert our custom list form that we are going to use to link the user to our updated form in the Check Out Log.

Now, in the header of the table type the text Check Out ItemCheck In Item as indicated above. Highlight Check Out Item and then click Insert > Hyperlink.

We need to create a formula to create our URI for the new form. For the address type {concat('../Check Out Log/CheckOut.aspx?SoftwareID=',/dsQueryResponse/Rows/Row/@ID)} and then click OK. This is an XSLT instruction that tells the processor to combine the values enclosed in single quotes. The result of this will be similar to ../Check Out Log/CheckOut.aspx?SoftwareID=1. Notice we are using a relative URL. By using a relative URL, if you have multiple access mappings all of your users will have access to the item no matter where it is located.

Lets do the same thing for Check In Item but enter {concat('../Check Out Log/CheckIn.aspx?SoftwareID=',/dsQueryResponse/Rows/Row/@ID)} for the address.

Most of this was pretty familiar in exploration. The part that I struggled with the most is what follows. Begin by right-clicking on the list Check Out Log and choose New > ASPX. Name the page CheckOut.aspx. You will notice there is nothing listed in this new page and no template has been applied to the page. We will correct this in a moment. Now, open the Data Source Library and right click on Check Out Log. Choose Show Data. You will see a screen with all of the SharePoint fields in this list. Notice there are many more fields than we initially specified on the creation of this list. In the list, click on Check Out Date and then hold down CTRL while clicking on Check Out By and Software. Click the drop down for Insert Selected Fields as and then choose New Item Form. This will create the New Item form we will be using to create new list items. Now we need to create take care of the parameters passed in our URI. If you remember, we created a URI that is similar to the following ../Check Out Log/CheckOut.aspx?SoftwareID=2. We need to instruct our new data view to capture the query string item SoftwareID. Click on the data view and on the menu click Data View > Parameters. Click on New Parameter and provide the name SoftwareID. For parameter source, choose QueryString and then type SoftwareID in the Query String Variable field. If you want, you can specify a default value. Click OK to close the dialog. Now we need to make a modification or two to the host form. Let's begin by associating the form with a master page. Click on Format > Master Page > Attach Master Page. Keep the default values and click OK until the master page is applied. Your page should now look more like your sharepoint site! The next thing we need to do is convert the default List Item Property for Software into a TextBox. To accomplish this, right click on the field and choose Format Item As > TextBox. Now we can handle our parameter we setup earlier. In the Tag Properties Task Pane, locate the Text property and then type {$SoftwareID}. This will set the value in the textbox to the value contained in the SoftwareID query string variable. The only thing left to do is hide the row containing the Software. In the markup bar find the tag for the row containing this control. In the Tag Properties Task Pane, location the style property and type display:none. This will hide our row from the user. Congratulations! We have now loaded a passed value into a custom list form. If you open your sharepoint site and then display the Software Library List. Add a new item and then click on the item in the list to show our customized display form. Click the Check Out Item link and you should see the custom new item form we just created. I know there are still some issues, for example, redirecting the user back to the original list, but this does work and you haven't had to write code. As I improve this technique, I will post my findings.