One of the best tips I've come across recently has been the use of a Creative Commons Attribution 3.0 License javascript library called LyteBox. This library allows you to incorporate some pretty cool effects into SharePoint using a simple content editor web part. Using this javascript library, a content editor web part and SharePoint Designer, my plan is to walk through creating a simple training site that gives users a Web 2.0 feel to training content.
First, download the scripts from the link above. After you have downloaded the scripts, create a new blank site. We're going to add our own lists and libraries to this site, so there is no need for us to have any existing content.
Getting LyteBox Setup
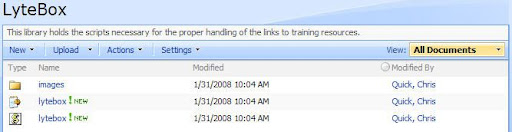
When you're new site has been provisioned, create a new document library called LyteBox and place all of the scripts and images into this library. Be sure to place all of the images in a new folder in this library called images.
Now, edit the page of your site and add a new content editor web part to top-right zone of the homepage (default.aspx). Edit the shared web-part and include the following lines using the source editor:
<script type="text/javascript" language="javascript" src="lytebox/lytebox.js"></script>
<link rel="stylesheet" href="lytebox/lytebox.css" type="text/css" media="screen" />
Change the Appearance of the web part and turn off the chrome. This way, the web part will not be displayed at all. If you'd like, export this web-part for reuse in other places in SharePoint.
Creating Training Libraries and Lists
Next, we need to create a few libraries and lists to use for our site. I need
a library to contain basic HTML pages and resources for those pages, a list to
create categories for the training labs and a list to contain the actual
training labs.
Create a new document library called Resources and upload a
few sample HTML pages (or create them with SharePoint Designer or a similar
tool). This will be the place that you can upload all of the materials needed
for your training labs. Our organization will be creating Camtasia projects for
the users to review. You could include anything that is HTML based for your
users in the library.
Next, create a custom list to contain a list of categories. I named this list
Categories and added the following items: Excel 2007, Word
2007, SharePoint 2007. This list will be used as a lookup for categorizing your
training sessions (and as a connected web-part for filtering the list of
available labs).
Now, the next list is the "meat and potatoes" list because this is where you
will be organizing the labs that are available. Create another custom list
called Training Labs and add the following columns to the list:
- Category, Lookup, Required -- linked to Categories - Title
- Description, Multiline
- Width, Number
- Height, Number
- Resource Link, HyperLink/Picture -- set to hyperlinks
At this point, you may want to create some items for testing when we get into
SharePoint designer. The idea is each item will provide a link to the resource
using the resource link column. This will be linked to an HTML page in the
Resources library. The width and height
columns will be used to control how large the LyteBox window becomes using some
cool SharePoint designer items.
Now the basic lists are available and ready to use for your site. Its time to
start wiring up all the pieces with SharePoint Designer.
SharePoint Designer
Open the site using SharePoint designer and then double click
default.aspx to open the page. In the toolbox (or click Task Panes), go
to the Data Source Library and locate the Training Labs list.
Click on the list and choose Show Data. In the list, highlight the title column
and drag this over to the default.aspx page right zone. Drop it in place below
the content editor we placed in the page earlier.
Now, using the Common Data View Tasks Widget, modify the columns you wish to
display. I added in the description and category fields to my display. Click on
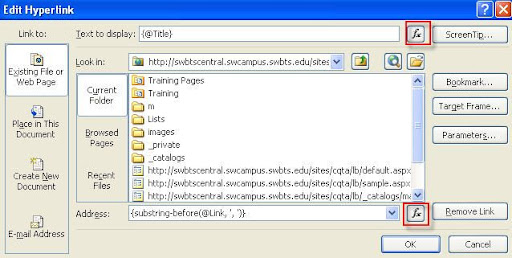
the widget for the title column and change it into a hyperlink column. For the
hyperlinks properties, make sure the Text to Display is set to {@Title}
and the Address is set to {substring-before(@Resource_x0020_Link,', ')}.
The easiest way to do this is to click on the Fx button for Address and choose
the Resource Link from the list and then do the same for the Text to display.
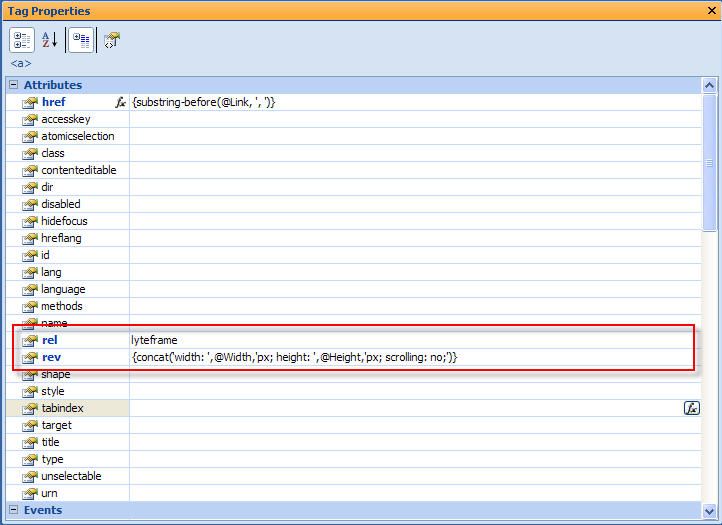
Now for the fun part. You will need to make some modifications to the tag
properties of the hyperlink so the LyteBox script will execute on the link. In
the rel attribute, set it to lyteframe. Then
locate the rev attribute and choose the function box. Make sure
to use the following function in the dialog:
concat('width: ',@Width,'px; height: ',@Height,'px; scrolling: no;')
Now, your properties should look something like the following:
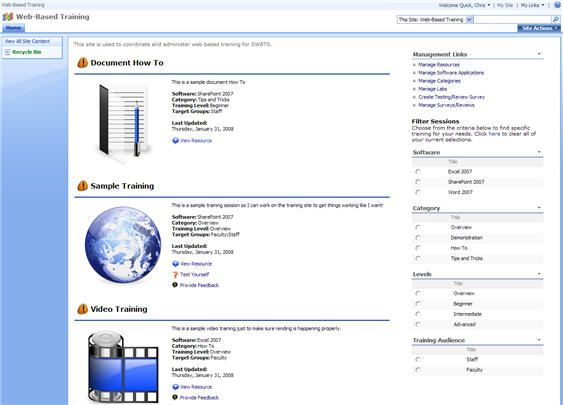
You should be ready to save your page and begin testing it out. If you have
been successful, your resources should load up in a Web 2.0 feeling box that
dims the surrounding area and displays the content in the box.
Filtering Content
The final step to make this site more useful is to allow your users to filter
the content based on the category. To do this, in SharePoint, edit your page and
add a web part for your Categories list to the Right zone (you can also do this
from inside of SharePoint Designer, but I prefer SharePoint's ability to set the
properties of the web part).
Go back into SharePoint designer and reload the page. Right click on your
Categories Web Part and choose Web Part Connections.
- Set the connection to Provide Row To and click Next.
- Choose to Connect to a Web Part on this Page and click
Next.
- Choose the Target Web Part as your Training Labs
DataView and the Target Action to Get Filter Values From
- Match up the columns between the Categories List and the Training Labs
List. This should be to set the Categories List to Title on the same row as
the Training Labs category row.
- Click on Finish.
Now save the page and load it up in your Browser. Test that the filter gets
applied and you can now review training labs based on the way your filter is
set.
I'll see if I can't upload the template I've created for you to dissect and
play with. My final template looks like the following: